Thursday, September 27, 2012

Make: Easy Fall Décor

I grew up in an enthusiastic home. This enthusiasm could be applied to a wide range of topics and occasions, but particularly holidays and seasons. We celebrated everything in full-force: the front porch wreaths and flags had quarterly rotations, my mother wore timely appliqués, we started planning our next Halloween costumes on November 1st, and even now my sister and I (along with our husbands) get Easter baskets. It was great.
 
Most of that perennial enthusiasm has stayed with me (with the exception of appliqués). I just love having my home reflect the year's changes. Packing away the lemons and apples to be replaced with pine cones and acorns feels like I am drawing a giant orange highlighter over the declaration
"Fall is here!".  I also just get tired of looking at the same stuff year-round!

If you think that seasonal décor is too much hassle, know that you can make just a few small changes that shift the overall feel of your home. You also don't need to spend a fortune. Most of what you see pictured here was either A) made by me or B) bought on the cheap. A festive home just takes a little effort and creativity. It helps if you live near a craft store too.

Front Porch


Let's start with the first thing that everyone sees: the front porch. Matthew and I take advantage of our porch whenever we can. It's not uncommon for us to load up our dinner plates and head for the Adirondacks. With this in mind, I try to make the space inviting for ourselves and guests alike.

In years past, I have lined our porch steps with pumpkins. Before long, however, they would be nibbled on and ruined by a few very pesky squirrels. This year I have a two pronged approach: just one pumpkin and I'm going to spray it with Apple Bitter. Fingers crossed it will last til Thanksgiving! The mums are a new addition that Matthew picked up at a nearby produce stand. The deep orange blooms are a welcome pop of color.

The front door wreath was a very easy and affordable DIY project. Actually, I believe it was the first thing I ever made for our house. I bought a simple grapevine wreath and LOTS of fake leaves from the dollar store. Then I arranged the leaves in a nice layout and hot-glued them into place. Done and done.


Living Room


I put the most effort into the space that we spend the most time: our living room. Our fireplace mantel is part-function, part-form since we keep most of our in-progress books there. Besides that unchanging component, I like to switch things up with staggered glass containers. They are a quick and easy way to transition from season to season. As referenced above, during spring and summer I fill the cylinders with apples, lemons, and limes. Now they are showcasing pine cones and autumnal potpourri. You will have to wait to see what winter looks like! I did a similar arrangement on the coffee table, using some leftover potpourri and three small pumpkins.

After seeing so many adorable word collages online, I decided to use some around the house. I printed a few, threw them in some super cheap frames and voila! Instant cute home décor with minimal effort. Here is a great collection of free printables.

Dining Room


Since I am not one for overkill, the fall decorations end here: the dining room. Naturally, my favorite new craft gets prominent placement on our dining room table. I found these chocolate brown placemats and napkins on clearance at Bed, Bath & Beyond. Wanting some additional color on the table, I then made the napkins rings. Similar to my front door wreath, this was another figure-it-out-as-I-go project. I cut up cardboard paper towel tubes and covered them with some extra-wide ribbon. Then I hot-glued faux leaves here and there until I was happy with the final product.

***

So there you have it! Hopefully this will inspire you to bring some seasonal beauty into your home!

On a related note, I'm excited to say that with the start of autumn begins a fun little "challenge" I'm posing to myself. I will to try one new fall-ish recipe each week! Sometimes I may write about them more extensively, but generally I will just provide a link at the end of my regular posts. Up first are some super easy Pumpkin Chocolate Cookies.


Thursday, September 20, 2012

Eat: Frozen Yogurt Pops!

People get excited about all sorts of things: new cars, fancy clothes, entertainment centers, fine jewelry, the latest Apple product, and so on.

Me? I get excited about a popsicle mold.

Oh boy, was I jazzed when I opened this birthday gift that I not-so-subtly asked Matthew to get me. (Ahem...an email with direct links to it on Amazon.)


As I have referenced previously, I love my sweet treats but thanks to my husband I have seen the healthy light. I try to find ways to satisfy my cravings while not skyrocketing my daily caloric intake. These popsicle molds will help tremendously in this effort. The best part is that you really don't need recipes; simply mix together yogurt (regular or greek, flavored or plain) with some fresh fruit, preserves, chocolate, or whatever else you fancy.

That being said, I've been gathering recipes like crazy. Here are just a few of the more elaborate ones I'm going to try!

Note: unless indicated otherwise, all of these recipes involve the same preparation--mix ingredients together, pour into molds (leaving 1 inch empty at top), freeze 4+ hours.

Pumpkin Pie, by Family Fresh Cooking
1 cup milk or fat-free yogurt
3 ounces unsweetened pumpkin purée
Sweetener, to taste (maple syrup, honey, agave...)
1/4 teaspoon pumpkin pie spice
pinch of fine sea salt

Vietnamese Coffee, by David Lebovitz
2 cups strong coffee or espresso
2/3 cup sweetened condensed milk
Regular milk, to taste

Faux Dreamsicles
2 cups yogurt
1.5 cups orange juice
1 teaspoon vanilla extract

"Spa Day", by Family Fresh Cooking
2-3 tablespoons lemon juice
2 cups cold water
Sweetener, to taste
1 cup julienned seedless cucumber

Combine juice, water, and sweetener. Fill popsicle molds 2/3 with the mix. Freeze uncovered for about 1 hour. Take the molds out of the freezer and scrape out the ice crystals. Stir this ice with the cucumber and spoon it all back into the molds. Freeze an additional 4-5 hours.
 
Apple Cider and Rosemary, by Bon Appetit

Combine in a saucepan:
4 cups apple juice
1/2 cup water
1/2 cup sugar
2 tablespoons chopped fresh rosemary
1 cinnamon stick, broken in half

Bring to a boil, stirring until the sugar dissolves. Reduce heat to medium for about 20-25 minutes. Strain into a large (4 cup) container. Cool to room temperature and stir in 4 teaspoons of cider vinegar and 1/4 teaspoon of vanilla extract.


Note: It is not lost on me that popsicle season is rapidly coming to a close, but I don't care! I'm going to bundle up next to the fireplace and enjoy me some frozen yogurt.

Monday, September 17, 2012

Make: Book-Pumpkin

I sometimes fall into the trap of drafting a crafty to-do list that is so long I end up making nothing at all. In an effort to combat this, a few weeks ago I prioritized which projects deserve the little free time I possess. This exceedingly cute book-pumpkin quickly rose through the ranks.


I adore fall decor (as you will see in a future post) and I love books, so this guy was a no-brainer. Once finished, I kept finding excuses to walk through my dining room and look at it.

I anticipate that house guests will ask me (with shiny hope in their eyes) from what book my darling pumpkin was made. The answer is a very boring United States Code Annotated, 2011. Upon closer inspection, onlookers will find decidedly unsexy text like:

Fees,
     Attorneys, ante
     Dockets and docketing, C4R 15(a)
     Extraordinary writs, prisoners C4R 21(c)
     Transcriptions, filing, sanctions, C4R IOP 11.1

As unromantic as that is, I just could not bring myself to ruin a perfectly good book!

In case you do not know, I work in law library which means that on a weekly basis we recycle volumes of publications that have been superseded. That is to say, if anyone were to use them for legal research they would be up a creak awful fast as the information is inaccurate. I'm just throwing that out there in case someone reading this cries foul, "Oh, how can a library throw away precious books!? For shame!". So I rescued a few of these books from the recycle bin and lugged them home for a bit of a makeover.

Supplies:
Book, cover removed
Cardboard
Pencil
Scissors
Stick (my husband gallantly found me one in the yard)
Ribbon
Broom (to clean up the mess of paper shards this project will leave on your floor)

Begin by creating a cardboard stencil. Think about how large you would like the pumpkin to be and draw the vertical half of that.


Then trace this shape on the first page of your book and cut through as many pages as you can at a time.


Repeat, repeat, repeat until you have made your way through the entire book. Of course, I chose a very thick book so I had to give my little wrists a few breaks along the way.

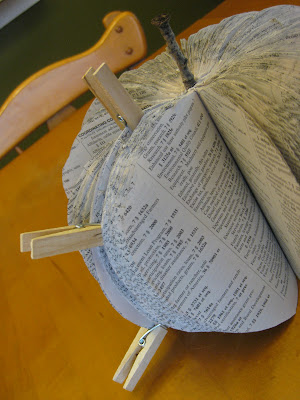
Glue a small stick to the spine of the book while also gluing together the front and back of the book. Secure it with clothes pins while it is drying, like so:


Once you are sure the glue is dry, you can jazz up the pumpkin with a cute bit of ribbon. The texture of my book's paper was very thin (like a phone book), so it required a lot of fussing over to make it sit nicely. If you use a regular book, I'm confident it will splay out naturally.

And that's it! You can make a single large pumpkin, a set of smaller ones, or a mix of sizes.


Tuesday, September 11, 2012

Eat: Chocolate Mud Cake & Kahlua Coffee Cookies

My recent flurry of travel has reminded me how fortunate I am to have people I can count on for time-consuming favors. Like dropping me off at and/or picking me up from: the train station, the bus station, and the airport. Such dependability and helpfulness should be rewarded...with baked goods! Here are a few of the recipes I've tried lately.

Chocolate Cobbler Mud Cake

For my parents, I baked a chocolate cake. I inherited my seriously sweet tooth from them and had a feeling this confection would hit the spot. My parents spoke so well of it that I made a second cake for my coworkers (snagging two pieces for myself and Matt first!). The original post on Southern Plate refers to this dessert as a "cobbler", which is definitely a misnomer as it features neither fruit nor crumbly crust. The finished product has a thick layer of chocolate pudding with fudgy cake on top; therefore I am renaming this concoction a "mud" cake. It is wonderfully rich and moist, plus all of the ingredients are likely to be found in the average kitchen pantry.


1 cup self-rising flour
3/4 cup sugar
2 tablespoons cocoa
1/2 cup milk
1 teaspoon vanilla
2 tablespoons vegetable oil
3/4 cup brown sugar
1/4 cup cocoa
1 3/4 cup hot tap water


Mix together the flour, sugar, and cocoa. Then stir in the milk, vanilla, and oil. Pour the batter into a greased 8x8 inch pan.

Combine the brown sugar and cocoa in a small bowl. Sprinkle the blend evenly over the cake batter. Very slowly and gradually, pour hot water over the entire thing. Bake at 350 degrees F for 40-45 minutes.

Kahlua Coffee Cookies

For my in-laws, I baked a batch of to-die-for cookies. Imagine a normal double chocolate cookie but with coffee grounds and Kahlua. Oh my word. Fortunately, I did save a few of these for us! I love coffee-flavored desserts and these are so dark and flavorful that just one or two make for a satisfying snack. I slightly modified a recipe from the Food Network . I wanted to make a large batch, so I used smaller spoonfuls of dough. The end result was thin, crispy cookies. If you prefer the opposite (thicker but fewer cookies), adjust the spoonfuls accordingly.

1 cup flour
1/2 cup brown sugar
1/4 cup white sugar
1/2 teaspoon baking soda
1/2 teaspoon salt
1 cup chocolate chips + grated chocolate, to taste
1 stick of butter, softened
1 egg, beaten
4 tablespoons Kahlua
2-3 tablespoons instant coffee (or espresso) granules
1 tablespoon coffee grounds

Mix together all of the dry ingredients first, then add the remaining. Scoop heaping tablespoons onto a baking sheet (a few inches apart) and bake for 8-10 minutes at 375 degrees F. Let cookies sit on the baking sheet for a few minutes before transferring to a cooling rack.


Wednesday, September 05, 2012

Go: 3 trips, 2 weeks, 1 post

The past two weeks have. been. crazy.

I will grant that Matthew and I tend to overbook ourselves on a regular basis, but we're always busy at home. Not the case this time! We were extended a few different travel opportunities that all jutted up against each other. With summer's end quickly approaching, we thought "why not!?" and decided to finish the season with a bang.

Things got started in mid-August when Matt went on his very first business trip; he attended a conference in downtown Atlanta. It was quite exciting as we are young tenderfoots who had not yet enjoyed the pleasure of eating dinner on company dime. It was also fairly significant since his employer rarely sends newer employees to conferences. It certainly warranted a photo to mark the occasion!


Looking good, even at 5am. I, on the other hand, needed to stay behind the camera.


Leaving on a jet plane...
I'm sorry to report that I was not able to join Matt, since I only have so much annual leave up my sleeve. I spent the week working, cleaning, baking, and watching PBS. The morning after he returned, we headed out to Lake Michigan. It is the usual vacation spot of Matt's father, who invites us every year to join him. The past few, we have both been in new jobs without enough vacation time stored up. This go around we were able and willing.

After 10+ hours, a freezing Megabus ride, a Chicago layover (complete with Intelligentsia Coffee) , and a lovely little train ride, we made it to our destination. We spent our days walking the beach and roaming adorable/expensive towns. One of the highlights for me was the small city of Holland. It boasts one of the most beautiful public libraries I have ever seen! Between the library and the scenic surroundings, I was positively smitten! Also noteworthy: the train we took home was HUGE. I honestly could not reach the seat in front of me, even with my tippy toes outstretched! It also featured an observation deck that made us feel like swanky, futuristic travelers. It turned me into a bit of a train snob.

Traveling in style!
 
How to look less attractive in a photo: squint.


Now, tell me this doesn't make you smirk!


We enjoyed one of these beauties every night.


A quiet morning outside of our cabin.


The Holland Public Library. Impressive, no?


The last sunset of our trip.

Never ones to rest on our laurels, we followed up this adventure with a Labor Day long weekend visit with Matt's sister in Kansas City. I played Monopoly with the kiddos, discovered that How to Train Your Dragon is actually a pretty good movie, picked fresh fruit, ate the most delicious curried apple turkey melt, and explored Powell Gardens.


We made a new friend: Chester, the Gardens' stray rescue cat.


Powell Gardens has a beautiful chapel on its grounds; this is the ceiling.


Another interior shot of the chapel.


The kids cooling off after a long day in this Missouri heat.
 

While wandering, Matt and I came upon these plastic, life-sized horses. I wish we could have gotten a picture of me climbing atop this thing...it was not my most graceful moment. I still don't think we were supposed to sit on them, as they weren't bolted to the ground or weighted. Oh well!


Needless to say, we are exhausted! I'm happy to be home and ready for September, my favorite month! We've decided to go into stealth mode for the next few weeks. This may be difficult, since I already have a full docket: 3-5 birthday celebrations (including some for me!), a wedding, the Great Balloon Race, our anniversary trip, breakfasts/brunches/dinners with friends, a retirement party, and a new bible study. Bring on the fun!

Stay tuned for some fantastic recipes! I have three words for you: chocolate, coffee, Kahlua.


Sunday, September 02, 2012

Make: DIY Jet-Pack


I was so excited when I first came across this DIY jet-pack on Pinterest! It is a cute and wonderfully creative way to upcycle soda bottles. It was also inexpensive, something I love in a craft!

Considering that I don't have children of my own, my niece and nephews are forced to endure much of their aunt's craft-enthusiasm. I made this for my sister's son, Colin, since his 3rd birthday was just around the corner. He also went through a brief but potent Buzz Lightyear phase.

You may be wondering why I am modeling this creation, rather than my nephew. Well, right now he adamantly hates having his picture taken (he hollers "No cheese! No cheese!"). Or he is running around so fast that I can't get a clear photograph. So I strapped on that puppy and set the self-timer on my camera.

This project is straightforward and allows for much improvisation in supplies, techniques, and colors. I was able to figure it out along the way, but here is a streamlined set of instructions.

Paint two 2-liter bottles (I chose gray)
Paint a strip of heavy-duty cardboard (preferably in a color coordinating with the bottles)
Glue bottles to each other and onto the cardboard
Attach straps--I used strips of velcro so the jet-pack can grow with the little astronaut!
Cut thin strips of felt fabric, glue the ends together, and glue those ends onto the bottle caps.

Note: I used a combination of Elmer's Glue and my hot glue gun. After some consideration (of how rambunctious my nephew is) I reinforced everything with duct tape. You can use your own discretion in this.

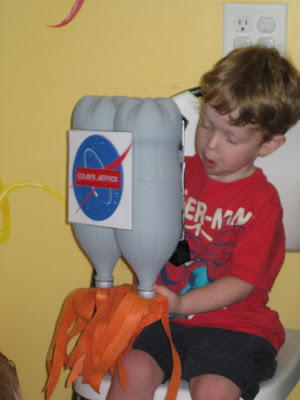
That's it! Or is it?? Sure, you could stop now and have a plain, mediocre jet-pack. However, I decided Colin's jet-pack was lacking a certain je ne sais quoi. I saved an image of the NASA logo and inserted it into a Word document. Then, I found this great website that lets users try the official NASA font without downloading it! I copy & pasted that text-image on top of the logo. Voila! And yes, that sign is laminated--no worries about spills! I must say that I am immensely proud of this project and had to keep myself from going around Colin's party asking  people what they thought of the jet-pack.

Matthew did manage to take a slightly blurry but hilarious picture of Colin opening the gift at his birthday party. He is always making the best faces!

"Woah!"

The overall awkwardness of this picture makes me laugh.