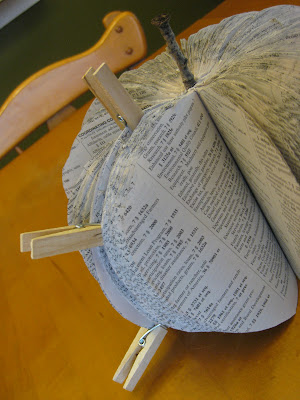
I sometimes fall into the trap of drafting a crafty to-do list that is so long I end up making nothing at all. In an effort to combat this, a few weeks ago I prioritized which projects deserve the little free time I possess. This exceedingly cute book-pumpkin quickly rose through the ranks.
I adore fall decor (as you will see in a future post) and I love books, so this guy was a no-brainer. Once finished, I kept finding excuses to walk through my dining room and look at it.
I anticipate that house guests will ask me (with shiny hope in their eyes) from what book my darling pumpkin was made. The answer is a very boring United States Code Annotated, 2011. Upon closer inspection, onlookers will find decidedly unsexy text like:
Fees,
Attorneys, ante
Dockets and docketing, C4R 15(a)
Extraordinary writs, prisoners C4R 21(c)
Transcriptions, filing, sanctions, C4R IOP 11.1
As unromantic as that is, I just could not bring myself to ruin a perfectly good book!
In case you do not know, I work in law library which means that on a weekly basis we recycle volumes of publications that have been superseded. That is to say, if anyone were to use them for legal research they would be up a creak awful fast as the information is inaccurate. I'm just throwing that out there in case someone reading this cries foul, "Oh, how can a library throw away precious books!? For shame!". So I rescued a few of these books from the recycle bin and lugged them home for a bit of a makeover.
Supplies:
Book, cover removed
Cardboard
Pencil
Scissors
Stick (my husband gallantly found me one in the yard)
Ribbon
Broom (to clean up the mess of paper shards this project will leave on your floor)
Begin by creating a cardboard stencil. Think about how large you would like the pumpkin to be and draw the vertical half of that.
Then trace this shape on the first page of your book and cut through as many pages as you can at a time.
Repeat, repeat, repeat until you have made your way through the entire book. Of course, I chose a very thick book so I had to give my little wrists a few breaks along the way.
Glue a small stick to the spine of the book while also gluing together the front and back of the book. Secure it with clothes pins while it is drying, like so:
Once you are sure the glue is dry, you can jazz up the pumpkin with a cute bit of ribbon. The texture of my book's paper was very thin (like a phone book), so it required a lot of fussing over to make it sit nicely. If you use a regular book, I'm confident it will splay out naturally.
And that's it! You can make a single large pumpkin, a set of smaller ones, or a mix of sizes.
Subscribe to:
Post Comments (Atom)


What a fabulous idea. Thanks so much for the picture tutorial - somehow I couldn't quite figure out how it was fastened together. This looks adorable.
ReplyDelete