Showing posts with label diy. Show all posts

Wednesday, October 09, 2013

Make: Ribbon Burp Cloths


"So...this is for a baby to throw up on?" was the question my husband asked while I made these adorable burp cloths for a pregnant friend. His inquiry was understandable. I suppose the only explanation is that babies are cute and (gosh darnit!) everything they have might as well be cute too. Have you seen cloth diapers lately? Positively darling yet they have a not-so-pleasant purpose! I made a batch of these ribbon burp cloths a while back (for the same pal that received these baby shoes and headband) and found them to be a breeze! Embellished burp cloths are a great DIY gift for your next baby shower, especially if you are short on time and/or a beginner sewer.


Ribbon Burp Cloths

Supplies Needed:
Prefold cloth diaper (or a plain burp cloth)
Ribbon
The usual gear: sewing machine, pins, sheers, coordinating thread, iron


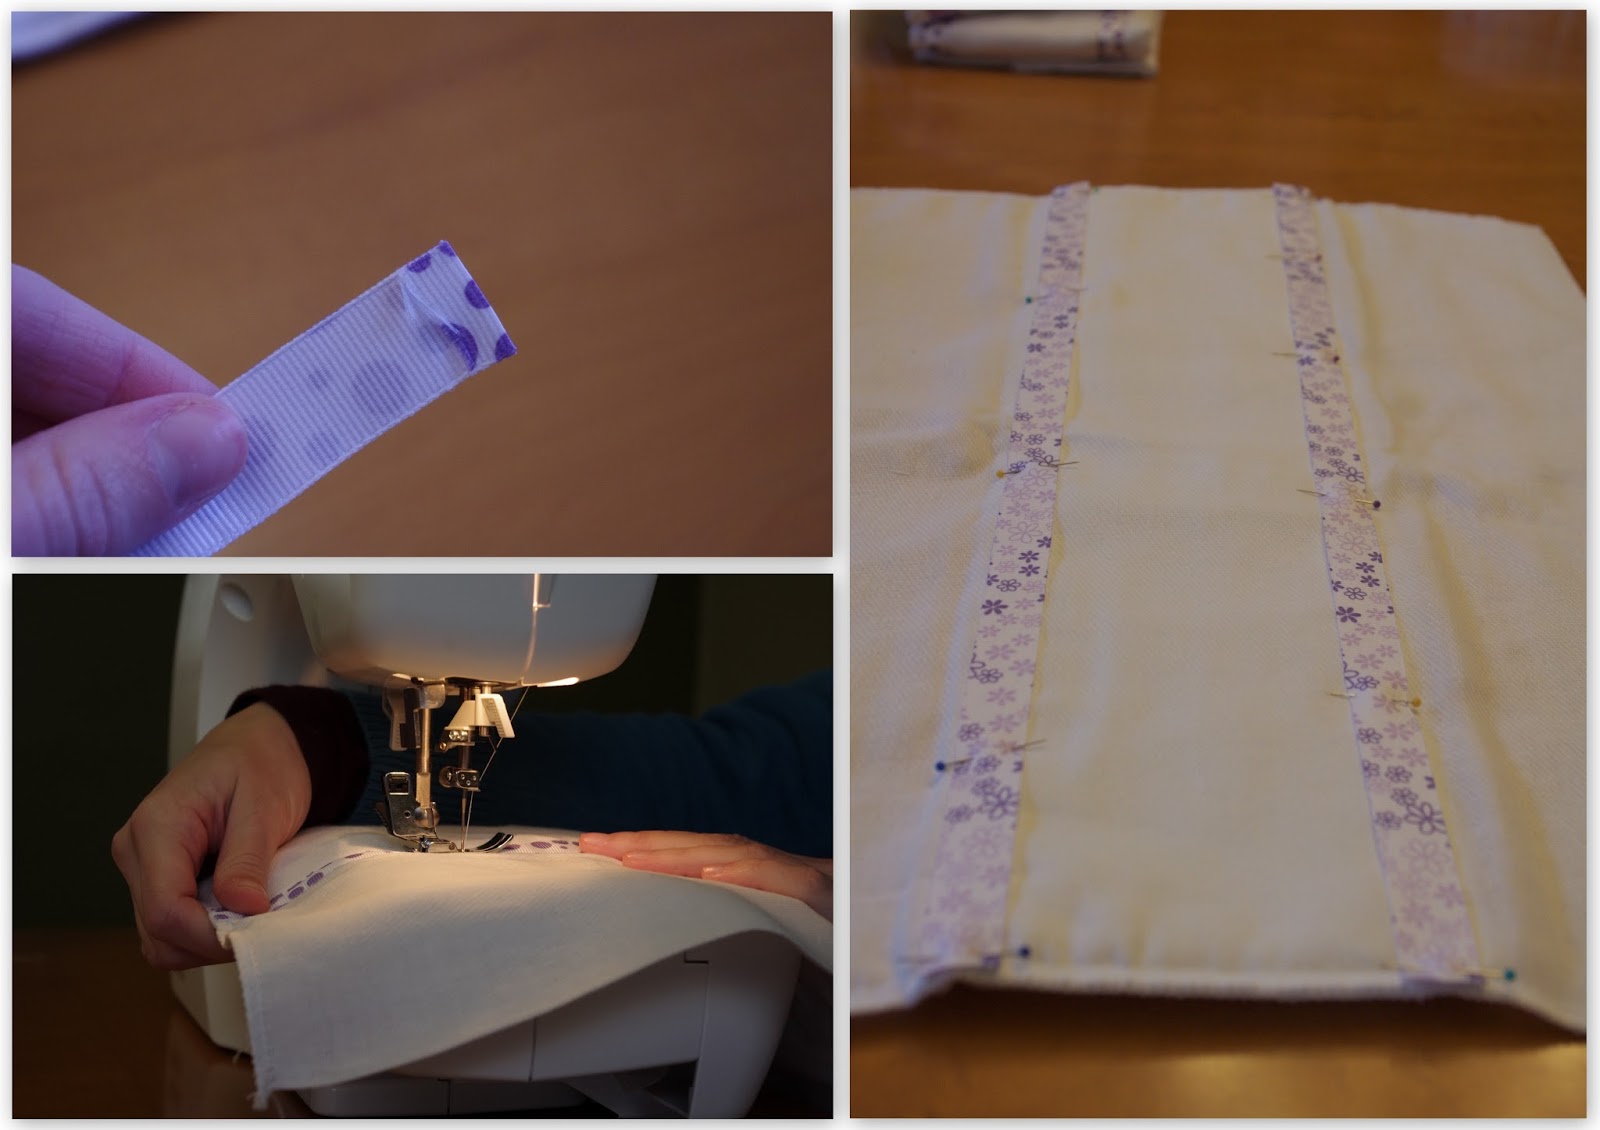
Measure the length of your burp cloths and add 1-inch to that measurement. Cut two ribbon pieces by that length.

Simply fold the raw ends of the ribbon down 1/2-inch and iron to keep folded (I used my hair straightener because it is a bit easier to get the fold exactly where you want it).

Lay the ribbon down on the burp cloth and pin into place. Repeat for the other ribbon.

Using a straight seam, sew along all of the edges of the ribbons.

Optional: I had a bit of ribbon leftover so I tied some sweet little bows and sewed them onto the burp cloths too.

And that's it! I look forward to more of my friends having babies so I can make more of these adorable burp cloths! Even if they are for a less-than-cute purpose.


Monday, August 19, 2013

Make: Men's Shirt Refashion

My husband has quite the impressive dress shirt collection. Currently, 47 long-sleeved dress shirts hang in his closet. If you think that's a lot, try guessing the number of ties! This set of 47 excludes a few that were recently discarded for either donation or refashioning  and subsequent move to my closet which isn't so much saving us storage space as it is moving items around. Oh well. Here is one such refashion.


I'm not really one to stay on top of fashion trends, but lately I have noticed more women wearing loose-fitting tops with cuffed sleeves. Like this NY&Co shirt. I love the look and think it's perfect for summer. So I dug through Matt's pile of discarded shirts and found one in a gorgeous deep blue tone. With a pretty clear idea of what I wanted the end result to be, away I went with my scissors and sewing machine. I am so thrilled with how this refashion turned out that I am tempted to make more just like it!

As you scroll down, you will find additional instructions and photos to (hopefully!) make everything clear. Please let me know if you have any questions.


Neckline
Begin by removing the collar and cutting the fabric to your desired neckline. In my case, I preferred a wide boatneck. Turn down and hem this newly-cut rough edge.

Sleeves
Cut off the sleeves at the spot right above your elbow. You want to make sure you have enough sleeve to roll. Now fold the sleeves up to your desired length and pin into place. I opted to sew the cuff into place (a 1/2-inch seam hidden along the interior of the sleeve) so that it wouldn't unroll willy nilly.

Now for the straps. Using the discarded fabric, cut a 1-inch wide strip (4-5 inches long) and fold it in half. Sew along the rough edge (making a narrow tube), then turn it inside out. Sew one end of the strip to the inside of the rolled sleeve  and pull it around to the outside of the sleeve, sewing this end into place too. Add a decorative button to this cover the outer seam. Repeat for the other sleeve. This is easier than it sounds; you want it to look like this:


Body
Take in the sides as needed. I wanted my shirt to have a flowing shape, so I only took in a bit of fabric around my chest. Play around with different degrees of tightness and decide what you like. Keep in mind that dress shirts don't stretch, so make sure it is loose enough that you can easily put it on and take it off.

Tuesday, August 06, 2013

Make: $2 Mailbox Makeover

I've mentioned before how much my husband and I enjoy spending time on our front porch. With that in mind, this summer I resolved to upgrade the overall cuteness of the space. One such project included our sad little mailbox. We live in a very old neighborhood near the city, so all of the houses have mailboxes mounted near the front doors. I don't know how old ours is, but it was looking quite faded and lackluster. The cure? Paint!


After some research, I decided that our mailbox did not need any primer because it is generally protected from mother nature by our covered porch. However, I still had to to use a metal-friendly paint. I know everyone is in love with spray paints like Rustoleum or Krylon, but I really did not want to buy a large can when I knew I'd have 85% leftover. Instead, I opted for Martha Stewart's all-purpose paint (2 fl. oz.) applied with a 2-inch wide sponge brush. After using a 25% off coupon at Michael's, this entire project cost me $1.95! Including tax, I might add. I applied four coats and waited the prescribed hour in between each. So while it took all afternoon to finish, it really only required minutes of active crafting.

After recently finishing a front porch sewing project that was very time consuming, this quick and easy undertaking was a much-needed breath of fresh air. I'm so thrilled with the final result and feel like we have a brand-new mailbox!

Friday, April 05, 2013

Make: Baby Shoes & Headband!

My friend Sarah is getting ready to have her first baby, which is exciting for a great number of reasons--the least of which is that I've gotten to make her a handful of cute baby crafts! The toughest part was narrowing down my long list of options. These oh-so-adorable shoes and headband were too sweet to skip!


 The best part? Both projects were super simple!

Felt Slippers

You can find several slightly different patterns online. I selected one by Martha Stewart found here. I had to print it out a few times while fine-tuning the scale. You want the sole to be roughly 3 inches long.

Then you use the stencil to draw and cut out both shapes on felt fabric.  Pin the top of the shoe (marked "upper" on the template) to the sole. Now slowly sew the pieces together. Don't worry if your seam is not completely straight!

Turn it inside out and voila! A baby shoe. Now you can decide what to do with the strap. I opted to sew a tiny button on one strap and carefully cut a short slit on the other strap. Other ideas include ribbon ties (short pieces sewn on each strap) or a small length of elastic (<1") permanently connecting the straps.

We've arrived at the best part: decorating! Flowers and bows are always fun, but I wanted something less common. I stacked two circles in contrasting colors then secured them onto the shoe with a white button.

Repeat for the second shoe.


Circle Headband

Once the shoes were finished, the headband pretty much designed itself. I sewed together 12 inches of narrow elastic and continued the circle-stack motif in a line of three along the elastic. I made sure to cover the elastic seam with one of the circles. To clean up the back of the headband (and hopefully make it more comfortable for baby), I glued a thin strip of white felt along the back sides of the circles (sandwiching the elastic).

Here is a quick overview of headband sizes for babies:
  • Newborn: 12 inches
  • 3-6 months: 13 inches
  • 6-12 months: 14 inches
  • 18-24 months: 16 inches

My only regret with this project is that both are sized for a brand spankin' new baby. She won't get to rock them for very long!


Sunday, March 17, 2013

Make: St. Patrick's Day Wreath


Happy St. Patrick's Day!

February 27th...

Megan: I guess I should take down our Valentine's Wreath, since February's over...but it's so gray and cold now, it seems stupid to put up our springy orchid wreath.

Matthew: You should make a St. Patrick's Day wreath.

Oh, how I love my husband!!

I did not need to hear this suggestion more than once before I hit the ground running with green felt and grapevines.

Basically, I cut out several clover-shapes in different sizes and stacked them together with some thread and buttons. I also used this flower tutorial. Lastly, I sewed little triangles along some ribbon to create a banner.

This was a decidedly not megan style of wreath, since I tend towards overly intricate projects that allow me to channel all of my not-quite-OCD energy. I did enjoy the change of pace and think I managed to pull off the "relaxed look" well enough.

Right now, my slow cooker is full of corned beef, cabbage, and potatoes. There's some beer bread baking too. Needless to say, my house smells very Irish and very good!


A special thanks to my grandmother who gave me an this old grapevine wreath she found in her basement.
It took a bit of elbow grease, but I managed to remove all of the hotglued bows, birds, and bulbs.


Follow my blog with Bloglovin


Thursday, February 28, 2013

Make: Dinosaur Hoodie


I cannot believe how long it has taken for me to write a post about this super adorable--ahem, I mean totally cool, big kid Dinosaur Hoodie. I made this as a Christmas present for my nephew, Colin. He loves dressing up as superheroes, so the idea of a pseudo-costume he can wear out in the real world was perfect!

I enjoy projects like this that are simple and customizable. You can make this for a boy or girl in whatever colors and patterns they prefer. You could also mix things up by using shapes other than triangles. It took me less than hour for the entire project, including cutting out the little felt pieces. Would you like to make one for the kiddo in your life? Would you rather make one for yourself? Either way, here's how!


Dinosaur Hoodie

You will need:
Hoodie
Felt
Scissors
Paper for template/stencil
Sewing supplies (sewing machine, thread, pins)

Begin by deciding how large you would like the "spikes" (or triangles along the spine) to be and draw a diamond that equals TWO of those triangles. You can also download this handy dandy template from Ginger & George. Cut out the paper template and use it to create as many felt diamonds as you want. I opted for several small "spikes" rather than a few large ones. I made twelve total.

There is a good chance that the hoodie has a seam running down the back. If so, you are in luck! Using this seam as a guide, pin the diamonds down the center of the hoodie--starting at the front of the hood and working your way to the bottom of the back of the shirt (see photo). If there is not a seam, then do your best to pin the felt pieces in a straight line.

Stitch along this line of diamond, taking care to go through the middle of each diamond.


Now fold each felt diamond in half and pin the side side together.

Finally, sew a straight seam around the edges of each triangle. I liked the idea of the spikes being flexible and flopping around as Colin runs about. But you could also reinforce the triangles with a bit of interfacing before sewing up the edges.

Do you see what's happening? Ah yes, now they are little triangles!

Now your little guy or gal is ready to transform into a dinosaur for the day!


Tuesday, February 12, 2013

(Don't Hate) Valentine's Day...a craft round up!

Growing up, my family celebrated Valentine's Day as, well, a family. My mom was pretty adamant that it was not a day exclusively for romance but rather a day to celebrate all sorts of love. She would make a fancy dinner for whole clan and my dad arrived home with not one but three bouquets. To this very day my grandmother, my mother, my father, my sister, my brother-in-law, my nephew, my husband, and myself all exchange candy gifts--I've even gotten my in-laws in the mix. I think this perspective takes Valentine's Day from a generally lame, pressure-filled day to a really great one. Dean Martin wasn't joking when he said everybody loves somebody sometime. Maybe that somebody is your spouse, partner, parent, friend, cat, whatever. My point is don't be a hater and join in the fun.

As I mentioned, my family has a sweet tooth so candy is the preferred Valentine's Day gift. Over the years, as our numbers have expanded so has the cost of candy! A few years back, Matthew and I began making homemade treats. This not only costs less but also allows us to give more candy to each person!


In years past, we've experimented with more elaborate recipes and combinations of treats. This go-around, however, we got back to our chocolate roots with straightforward candy molds. I bought a small set of heart-shaped molds along with several ounces of semi-sweet chocolate. Then we played around with different "extras" like wafers, sprinkles, crushed-up Whoppers, and the like. It made for a fun evening together. All of the candies were divided among plain boring sandwich bags which were instantly transformed into adorable Valentine's Day bags with these toppers designed by Thirty Handmade Days.


And this centerpiece? Easy as can be. Starting with my apothecary jars, I simply cut three heart shapes out of seasonal scrapbook paper, added smaller red paper hearts, and secured everything with yarn. I threw in some scented red candles for good measure.


I love this argyle wreath. It is wonderfully understated in a world of over-the-top, cheesy Valentine's decorations. Assembly is easy but time consuming. To begin, tie a loop of yarn around a form ring, securing it with a double knot. Then, wrap the yarn around the ring a few times and smoosh it all together so that you can't see any foam behind it. Also pull the yarn taut. Move on to the next section of foam and repeat, repeat, repeat until you have covered the entire ring. Tie one final knot on the back side of the wreath. I opted to add small felt hearts, laying them out flat on the wreath. Then I carefully wove more yarn around the wreath, taking care to make an X over each heart so they won't slip out of place.


Last is my banner. Oh, this was fun! A friend of mine posted this on Facebook January 31st and I knew I wanted to try it. It's sort of like an advent calendar for Valentine's Day, where each envelope has a fun activity for you and your partner (or family, friends, etc). I made a list of easy, low-key activities ranging from a picnic dinner to a martini night. Considering I threw this together at the last minute and I'm terrible at writing in bubble letters, I think it turned out nice enough.

That's it for my Valentine's Day round up; I hope this holiday finds you in good spirits and ready to share some love with those around you!

Wednesday, January 23, 2013

Make: Sweatshirt Refashion!

Cute + Comfortable. These are my two goals in fashion. I spend most of my work days accomplishing the first, but generally not the second. So as soon as I get home I want to ditch the dress pants and fancy-lady shoes for my ripped jeans and moccasin slippers. To top it off? More often than not, an oversized hoodie sweatshirt. This moves me closer to my second goal (comfortable) yet further from the first (cute). Surely there is some way to achieve both!

My sweatshirt collection was huge and dated all the way back to my Freshman year of high school.
 I recently came to terms with the fact that I do not need a dozen hoodies taking up limited (and therefore precious) closet space. Thus I resolved to get rid of several, keep a few in tact, and try my hand at refashioning. Overall, I was successful in these endeavors. I have reclaimed some closet space and ended up with some cute redone tops.

Shawl-Neck Sweater

I am so proud of this project! It was inspired by a picture I came across online and wanted to recreate. I had my doubts that it would work, since I basically drew a sketch and started cutting away at the material. Considering that I was working with the limitations of an already-made top, I think I did a fine job turning an oversized, appliqued hoodie into a cute shawl-neck sweater!


Despite my desire to recreate the inspiring photo (left),
I just couldn't bring myself to hold my hands in such an awkwardly unnatural way.
Instead, I settled with cropping off the top 3/4 of my face.

You will need:
Hoodie
Coordinating thread
Button(s)
Pins
Scissors
Sewing Machine

Begin by removing the front pocket. Doing this actually required me to take off the entire band around the bottom of the sweatshirt (which I later re-attached). Also remove any unwanted embroidery with a seam ripper or small shears; if your sweatshirt has screen printing--sorry, that is not going anywhere.

I think the rest is easier to explain/understand with visual representation.


Note: I folded under the raw edge (of the little flap) for a cleaner look but this step is not necessary since the material won't fray.

If your sweatshirt already fits then you are done! If yours (like mine) is too big, then do the following:

Turn the shirt inside out and lay flat. Take a shirt that does fit (preferably another sweatshirt) and lay it on top. Line up the shoulder seams and mark where to take in the sleeves and/or sides. Also pin along this marked line. Sew along the marked lines and cut away the excess material. Turn it right-side out, try it on, then make any needed adjustments.

Ah, American Eagle! I told you my entire sweatshirt collection dates back to high school.

Now you are good to go! Get ready to be cute and comfortable!


Wednesday, January 16, 2013

Make: Reusable Swiffer Cover


I like my Swiffer Sweep as much as the next person, but I hate burning through so many disposable covers. Not only do they generate more waste, the cost adds up too! So I immediately jumped on board when I came across a picture on Pinterest of a reusable cover. This is, of course, in tandem with my decision to start making more of my household cleaners. I briefly looked for instructions (without any luck) but quickly decided that I could wing it on my own.

Reasons you should make this:
  • This is a very fast DIY undertaking. Start to finish, the quickest sewing project I've done.
  • Dual purpose: you can use it to sweep or mop (using a batch of homemade All-Purpose Cleaner!).
  • It will save you money.
  • It works! I've been using this for a month and it gets the job done.

Tip: take a few extra minutes to make a few of these covers, so you don't have to rush to do laundry in between floor-cleaning sessions.

Materials Needed:
Fleece, 6" x 17" (for a standard-size Swiffer Sweeper)
Thread
Sewing machine
Pins
Scissors

Begin by cutting the fleece into 3 pieces:
A: 6" x 10.5"
B: 6" x 3"
C: 6" x 3"


The large rectangle will be the base/bottom of the cover. Take one of the smaller pieces and line it up with the sides/corners of the base. Pin into place.

Repeat this with the remaining piece, lining it up with the opposite end of the base.

Disregard the excess fabric on the edge of my cover; I was still figuring out how large to make each piece.
Also, you do not need to whip out the sweeper for measuring/fitting, as I did.

Now you just sew along the outer edges, making little pockets on each end. It should have be loose fit in order to easily get the cover on/off of the Swiffer.


Seeing it in action!

I hope you will give this reusable Swiffer cover a try. I've been very pleased with the results and suspect you will be too!


Wednesday, January 09, 2013

Make: Homemade Cleaners (with free labels!)


Although I have been using my easy homemade laundry detergent for over a year, I only recently jumped on the homemade cleaner bandwagon. This goes along with my new year's resolution to make our house more environmentally-friendly and less chemical-ridden. My home is not quite as "green" as I would like, but we're moving the in the right direction.

I was so excited by this endeavor that I even made my very own spray bottle labels which you can download by CLICKING HERE.  (These are for personal use only!)


There are many, many variations of homemade cleaning solutions out there. I found it helpful to learn a bit about the different components before choosing my "recipes". Standard ingredients for most cleaning solutions include: 

Vinegar has been used for centuries as a cleaning product. It is highly acetic and kills mold, bacteria, and germs. A natural organic bi-product of fruits, vegetables and grains, vinegar is safe for the environment and your family. It also has a crazy long shelf life and the unpleasant smell dissipates after a few minutes.

Water is primarily for diluting vinegar and dissolving the items listed below.

Baking Soda is mildly abrasive and therefore useful for scrubbing (without scratching) while also removing odor; this makes it best suited for kitchen and bathroom cleaning.

Washing Soda is commonly confused with baking soda, though the two have totally different chemical makeup. In general, just remember that it is more abrasive than baking soda and it is generally recommended to wear gloves/mask while cleaning with washing soda.

Castile Soap has a base of vegetable oils like palm, coconut, hemp, jojoba, or olive. Most other soaps actually have a petroleum base. The name "Castile" comes from the Spanish city famous for its olive oil as well as this style of soap.

Essential oils like lavender or tea tree come in handy since the above ingredients do not exactly smell wonderful.

So there is your basic overview, but what exactly do you do with all of these ingredients?? I am currently using the following cleaning solutions. Note that both of these require giving the bottle a good shake before use.

All-Purpose Cleaner
1/8 cup white vinegar
1 tablespoon baking soda
2 cups hot water

Pre-Wash Fabric Spray (stain treatment)
½ c. ammonia
½ c. white vinegar
¼ c. baking soda
2 tbsp. liquid soap or laundry detergent
2 quarts water

If you would like more suggestions, I found an exhaustive list over at Young House Love. I definitely plan to use more of these recipes in the future!

Next week I will show your how to make your own reusable Swiffer cover!


Tuesday, December 18, 2012

Make: Tulip Skirt


I think it's time to take a break from all of the holiday crafts and share this fun "Tulip Skirt" with you!

I don't want to get into the habit of recreating tutorials, like this one from Cotton & Curls, but I actually had a difficult time following her written instructions. So I re-wrote the directions for my own sake and have decided to share this more detailed version with you.

Funny story: Although I just made this skirt a few weeks ago, I feel like it counts as vintage! You see, over the summer my grandmother (or rather, Mimi, as she is known in my family) found a bag of untouched fabric that had been burried in her closet for years. It had been so long that she couldn't remember what she had intended to do with it. While investigating, we found a faded receipt stating April 1993! That's a whopping nineteen years! She gave me the fabric with the stipulation that I make something nice with it. I think I was successful.

Supplies:
1.5 yards of flowy fabric
Thread
Buttons (2-3)

1. Cut the piece of fabric in an elongated half-oval. The top line of the shape should be your waist measurement x 2, then add another 12-16 inches (since it will wrap around your waist). The larger this measurement, the more gathered the final product will be. I used another skirt to determine the length.


2. Hem the curved edge.
3. Gather the top of the skirt, enough that it equals your waist measurement + 12-16”. If you don't know how to gather fabric, here is a great tutorial.


4. Bias Tape: decide how wide you want the waistband, then multiply that number by 2, and add an extra inch. Cut a strip of fabric (length = your waist measurement + 12-16") with that final width. Hem the short edges. Fold it in half lengthwise and iron. Then fold down both of the raw edges 1/4 inch and iron—DO NOT HEM.

**See Note**

5. Pin and sew one of the folded-under edges to the inside of the skirt (along the top) and sew a straight stitch.

6. Fold the bias tape over the waistband to the outside of the skirt and pin down. Sew a straight stitch along the edge of the waistband.


7. Add 2 buttons to the front of one end, 6" to 9" apart (depending on how much you want the skirt to cross over).

8. Now make 2 buttonholes the same width across on the other side. You can make extra holes to adjust waist size.

 **Note: If you want one of the buttons to be hidden (like mine), sew a single buttonhole on just one side of the waistband before step 5.


I felt oh-so-awkward taking these photos.