Showing posts with label sewing. Show all posts

Wednesday, October 09, 2013

Make: Ribbon Burp Cloths


"So...this is for a baby to throw up on?" was the question my husband asked while I made these adorable burp cloths for a pregnant friend. His inquiry was understandable. I suppose the only explanation is that babies are cute and (gosh darnit!) everything they have might as well be cute too. Have you seen cloth diapers lately? Positively darling yet they have a not-so-pleasant purpose! I made a batch of these ribbon burp cloths a while back (for the same pal that received these baby shoes and headband) and found them to be a breeze! Embellished burp cloths are a great DIY gift for your next baby shower, especially if you are short on time and/or a beginner sewer.


Ribbon Burp Cloths

Supplies Needed:
Prefold cloth diaper (or a plain burp cloth)
Ribbon
The usual gear: sewing machine, pins, sheers, coordinating thread, iron
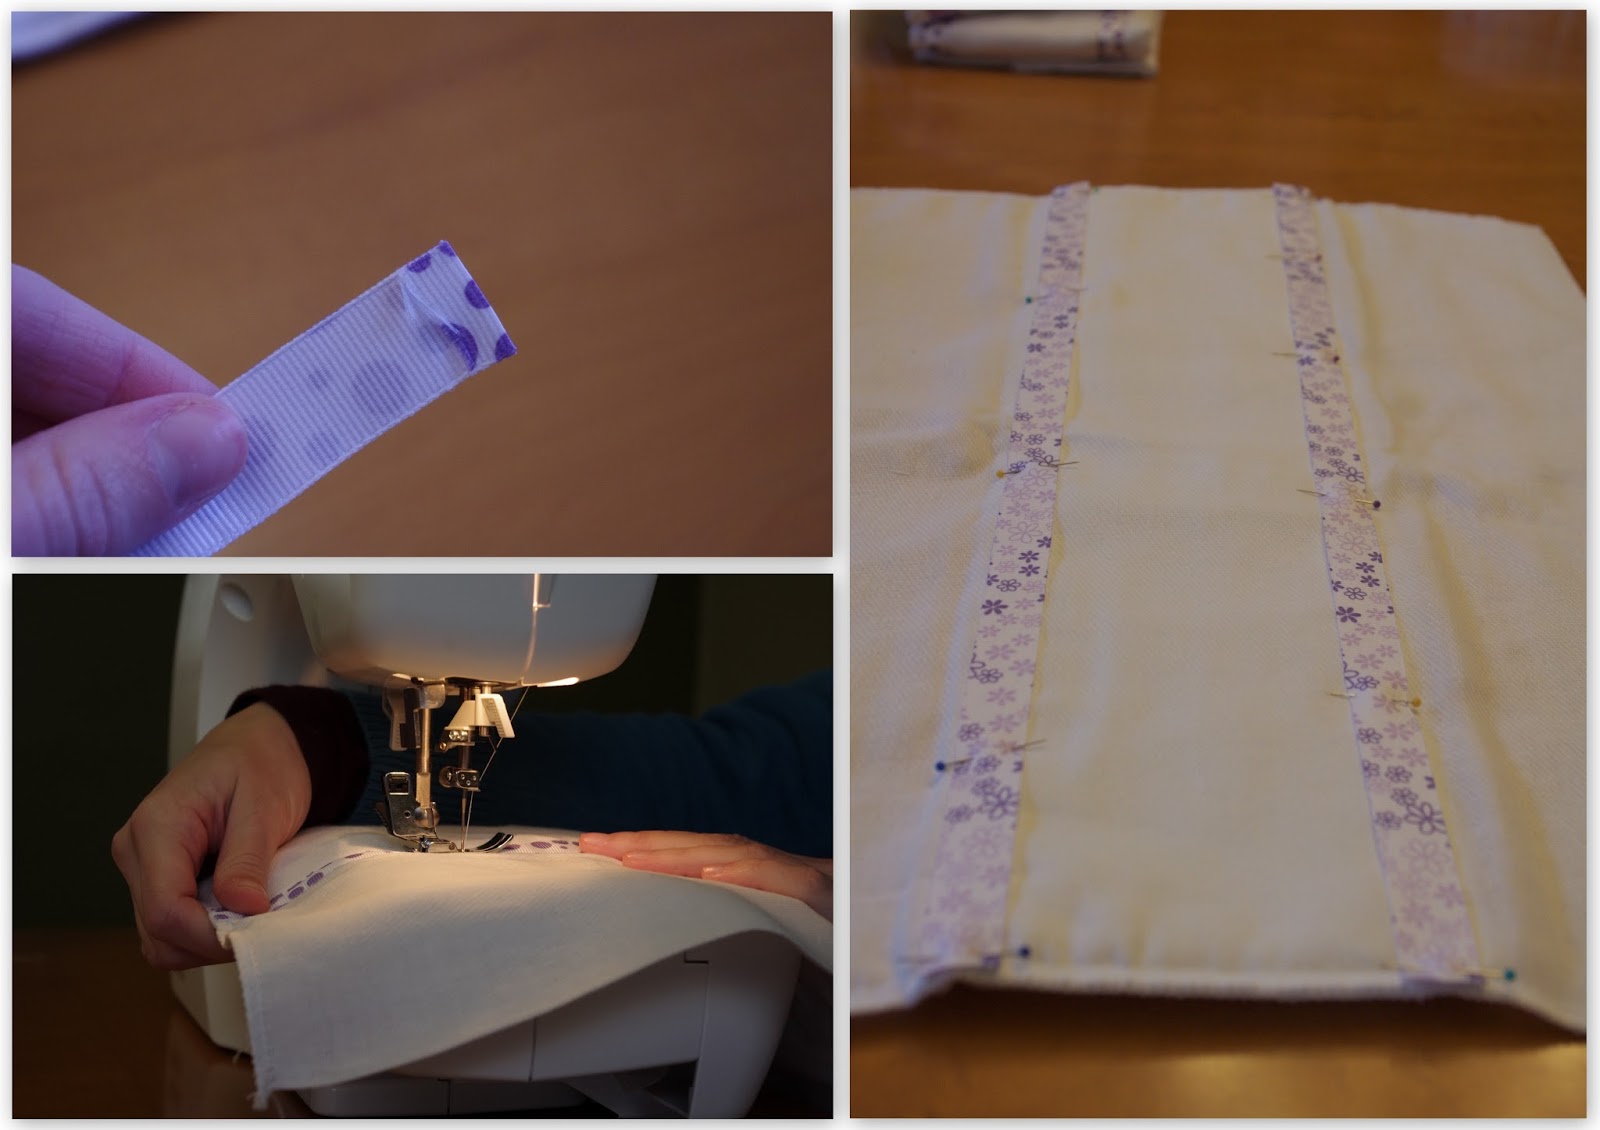


Measure the length of your burp cloths and add 1-inch to that measurement. Cut two ribbon pieces by that length.

Simply fold the raw ends of the ribbon down 1/2-inch and iron to keep folded (I used my hair straightener because it is a bit easier to get the fold exactly where you want it).

Lay the ribbon down on the burp cloth and pin into place. Repeat for the other ribbon.

Using a straight seam, sew along all of the edges of the ribbons.

Optional: I had a bit of ribbon leftover so I tied some sweet little bows and sewed them onto the burp cloths too.

And that's it! I look forward to more of my friends having babies so I can make more of these adorable burp cloths! Even if they are for a less-than-cute purpose.


Monday, August 19, 2013

Make: Men's Shirt Refashion

My husband has quite the impressive dress shirt collection. Currently, 47 long-sleeved dress shirts hang in his closet. If you think that's a lot, try guessing the number of ties! This set of 47 excludes a few that were recently discarded for either donation or refashioning  and subsequent move to my closet which isn't so much saving us storage space as it is moving items around. Oh well. Here is one such refashion.


I'm not really one to stay on top of fashion trends, but lately I have noticed more women wearing loose-fitting tops with cuffed sleeves. Like this NY&Co shirt. I love the look and think it's perfect for summer. So I dug through Matt's pile of discarded shirts and found one in a gorgeous deep blue tone. With a pretty clear idea of what I wanted the end result to be, away I went with my scissors and sewing machine. I am so thrilled with how this refashion turned out that I am tempted to make more just like it!

As you scroll down, you will find additional instructions and photos to (hopefully!) make everything clear. Please let me know if you have any questions.


Neckline
Begin by removing the collar and cutting the fabric to your desired neckline. In my case, I preferred a wide boatneck. Turn down and hem this newly-cut rough edge.

Sleeves
Cut off the sleeves at the spot right above your elbow. You want to make sure you have enough sleeve to roll. Now fold the sleeves up to your desired length and pin into place. I opted to sew the cuff into place (a 1/2-inch seam hidden along the interior of the sleeve) so that it wouldn't unroll willy nilly.

Now for the straps. Using the discarded fabric, cut a 1-inch wide strip (4-5 inches long) and fold it in half. Sew along the rough edge (making a narrow tube), then turn it inside out. Sew one end of the strip to the inside of the rolled sleeve  and pull it around to the outside of the sleeve, sewing this end into place too. Add a decorative button to this cover the outer seam. Repeat for the other sleeve. This is easier than it sounds; you want it to look like this:


Body
Take in the sides as needed. I wanted my shirt to have a flowing shape, so I only took in a bit of fabric around my chest. Play around with different degrees of tightness and decide what you like. Keep in mind that dress shirts don't stretch, so make sure it is loose enough that you can easily put it on and take it off.

Thursday, June 13, 2013

Make: Skinny Refashion


First, a brief history. Second, a brief tutorial.

A Brief History
If you thought skinny pants were a product of the 20th century, you would be mistaken. Actually, slim-fit pants date back to the late 18th century. Not only that, they were a political statement. Radical left-wingers of the French lower class wore full-length pants tailored tightly from waist to ankle, all in response to the knee-length breeches popular among the upper class. Over the decades, the style's association has changed as often as the name, including drainpipes, stovepipes, cigarette pants, and pencil pants. Skinnies have been linked to everything from classic & subdued fashion (see Audrey Hepburn and Sandra Dee) to heavy metal and pop/rock music (see Poison and Freddie Mercury). The most recent (and current) resurgence was in response to the oversized and baggy clothing prevalent in the 1990s.

So there you go. I bet you were not expecting a history lesson today, were you?!?


A Brief Tutorial
For a while I'd been wanting to expand my skinny pant wardrobe beyond denim. Then a few weeks ago I was digging through some soon-to-be-donated clothes and noticed a pair of black bell bottoms. Inspiration struck and I was thrilled! Especially because they fit really well from the knees up, meaning the undertaking would be simple and straightforward.

If you want to skinny-fy a pair of pants, you have two options.

Option 1: Pinch and Pin
Turn your pants inside out and try them on in front of a mirror. Working your way down from hip to ankles, pin along the inside and outside of your leg, making the pant leg as tight as you prefer. After doing this on both sides, very carefully take off the pants. You can also mark along the pins for extra guidance.


Option 2: Template
Turn your pants inside out and lay them flat. Use a pair of (already-fitting) skinny pants as a template and lay them on top of your non-skinny pants. Be sure to line up the crotches (strange sentence to type, btw!) and mark where your new seams will be. Pin along those lines.


TIP: If you want to keep the "professional" seam on the outside of your pants, be sure to gather the fabric on the inside of your pant legs only!

Regardless of which option you choose, now you will sew straight seams along your markings/pins. Cut away the excess fabric, turn them right side out, and try them on. If you are unhappy with the first, repeat all of the above steps to alter as needed.

I chose the pinch and pin method and it worked great. I was pleasantly surprised by how quick and easy this project was. It makes me want to go through my closet and find more pants to transform!


Friday, April 05, 2013

Make: Baby Shoes & Headband!

My friend Sarah is getting ready to have her first baby, which is exciting for a great number of reasons--the least of which is that I've gotten to make her a handful of cute baby crafts! The toughest part was narrowing down my long list of options. These oh-so-adorable shoes and headband were too sweet to skip!


 The best part? Both projects were super simple!

Felt Slippers

You can find several slightly different patterns online. I selected one by Martha Stewart found here. I had to print it out a few times while fine-tuning the scale. You want the sole to be roughly 3 inches long.

Then you use the stencil to draw and cut out both shapes on felt fabric.  Pin the top of the shoe (marked "upper" on the template) to the sole. Now slowly sew the pieces together. Don't worry if your seam is not completely straight!

Turn it inside out and voila! A baby shoe. Now you can decide what to do with the strap. I opted to sew a tiny button on one strap and carefully cut a short slit on the other strap. Other ideas include ribbon ties (short pieces sewn on each strap) or a small length of elastic (<1") permanently connecting the straps.

We've arrived at the best part: decorating! Flowers and bows are always fun, but I wanted something less common. I stacked two circles in contrasting colors then secured them onto the shoe with a white button.

Repeat for the second shoe.


Circle Headband

Once the shoes were finished, the headband pretty much designed itself. I sewed together 12 inches of narrow elastic and continued the circle-stack motif in a line of three along the elastic. I made sure to cover the elastic seam with one of the circles. To clean up the back of the headband (and hopefully make it more comfortable for baby), I glued a thin strip of white felt along the back sides of the circles (sandwiching the elastic).

Here is a quick overview of headband sizes for babies:
  • Newborn: 12 inches
  • 3-6 months: 13 inches
  • 6-12 months: 14 inches
  • 18-24 months: 16 inches

My only regret with this project is that both are sized for a brand spankin' new baby. She won't get to rock them for very long!


Thursday, February 28, 2013

Make: Dinosaur Hoodie


I cannot believe how long it has taken for me to write a post about this super adorable--ahem, I mean totally cool, big kid Dinosaur Hoodie. I made this as a Christmas present for my nephew, Colin. He loves dressing up as superheroes, so the idea of a pseudo-costume he can wear out in the real world was perfect!

I enjoy projects like this that are simple and customizable. You can make this for a boy or girl in whatever colors and patterns they prefer. You could also mix things up by using shapes other than triangles. It took me less than hour for the entire project, including cutting out the little felt pieces. Would you like to make one for the kiddo in your life? Would you rather make one for yourself? Either way, here's how!


Dinosaur Hoodie

You will need:
Hoodie
Felt
Scissors
Paper for template/stencil
Sewing supplies (sewing machine, thread, pins)

Begin by deciding how large you would like the "spikes" (or triangles along the spine) to be and draw a diamond that equals TWO of those triangles. You can also download this handy dandy template from Ginger & George. Cut out the paper template and use it to create as many felt diamonds as you want. I opted for several small "spikes" rather than a few large ones. I made twelve total.

There is a good chance that the hoodie has a seam running down the back. If so, you are in luck! Using this seam as a guide, pin the diamonds down the center of the hoodie--starting at the front of the hood and working your way to the bottom of the back of the shirt (see photo). If there is not a seam, then do your best to pin the felt pieces in a straight line.

Stitch along this line of diamond, taking care to go through the middle of each diamond.


Now fold each felt diamond in half and pin the side side together.

Finally, sew a straight seam around the edges of each triangle. I liked the idea of the spikes being flexible and flopping around as Colin runs about. But you could also reinforce the triangles with a bit of interfacing before sewing up the edges.

Do you see what's happening? Ah yes, now they are little triangles!

Now your little guy or gal is ready to transform into a dinosaur for the day!


Tuesday, December 18, 2012

Make: Tulip Skirt


I think it's time to take a break from all of the holiday crafts and share this fun "Tulip Skirt" with you!

I don't want to get into the habit of recreating tutorials, like this one from Cotton & Curls, but I actually had a difficult time following her written instructions. So I re-wrote the directions for my own sake and have decided to share this more detailed version with you.

Funny story: Although I just made this skirt a few weeks ago, I feel like it counts as vintage! You see, over the summer my grandmother (or rather, Mimi, as she is known in my family) found a bag of untouched fabric that had been burried in her closet for years. It had been so long that she couldn't remember what she had intended to do with it. While investigating, we found a faded receipt stating April 1993! That's a whopping nineteen years! She gave me the fabric with the stipulation that I make something nice with it. I think I was successful.

Supplies:
1.5 yards of flowy fabric
Thread
Buttons (2-3)

1. Cut the piece of fabric in an elongated half-oval. The top line of the shape should be your waist measurement x 2, then add another 12-16 inches (since it will wrap around your waist). The larger this measurement, the more gathered the final product will be. I used another skirt to determine the length.


2. Hem the curved edge.
3. Gather the top of the skirt, enough that it equals your waist measurement + 12-16”. If you don't know how to gather fabric, here is a great tutorial.


4. Bias Tape: decide how wide you want the waistband, then multiply that number by 2, and add an extra inch. Cut a strip of fabric (length = your waist measurement + 12-16") with that final width. Hem the short edges. Fold it in half lengthwise and iron. Then fold down both of the raw edges 1/4 inch and iron—DO NOT HEM.

**See Note**

5. Pin and sew one of the folded-under edges to the inside of the skirt (along the top) and sew a straight stitch.

6. Fold the bias tape over the waistband to the outside of the skirt and pin down. Sew a straight stitch along the edge of the waistband.


7. Add 2 buttons to the front of one end, 6" to 9" apart (depending on how much you want the skirt to cross over).

8. Now make 2 buttonholes the same width across on the other side. You can make extra holes to adjust waist size.

 **Note: If you want one of the buttons to be hidden (like mine), sew a single buttonhole on just one side of the waistband before step 5.


I felt oh-so-awkward taking these photos.


Tuesday, November 20, 2012

Make: Reversible Table Runner

I've recently realized how superior table runners are to tablecloths. You get the same pop of color and design as a tablecloth, but we can move it out of the way during meals thereby avoiding spills and stains. In our household, this is a legitimate concern as many once-pretty table linens have bitten the dust.

So the other day, while admiring my store-bought runner I noticed its simple construction. The thought, I bet could I make this! was quickly followed by another, more creative one: Why not make both sides out of cute but different fabrics?? So off I went in search of a fun (but grown-up) holiday fabric and a neutral print that could carry us through post-December winter. I am just so happy with how the runner turned out! So much so that I've decided it will not be displayed at our Christmas Kick-Off Party, because our friends seem to be as bad about spills as we are! This beauty must stay pristine!


An easier version would use bias tape around the edges--I felt like 75% of my time was spent lining up the edges perfectly. Here I wanted a simple design without a border, but in the future I'll probably opt for bias tape.

Materials Needed
2 rectangles of coordinating fabric (mine were 17" x 43")
Scissors
Pins
Thread
Sewing Machine
Iron

The construction is quite easy and straightforward. Begin by hemming the edges of one fabric piece. Before you hem the other, you want to ensure that the two rectangles will line up nicely. I did this by laying the finished piece on top of the unfinished (right sides out), then marking/pinning everything into place. Sew the whole shebang together around the edges (whatever decorative stitch you prefer). To finish, iron.


Easy, right?!

No-Sew Version: simply iron the rough edges back to create faux hems, then use stitch witchery to fuse the two pieces of fabric together.