Showing posts with label EAT. Show all posts

Tuesday, September 24, 2013

Eat: Sweet Potato Tarts

The first half of September featured a very unwelcome heat wave. How am I supposed to start decorating my house with fall leaves and wrap myself with a chunky cableknit sweater when it is ONE HUNDRED degrees outside?! Fortunately, cooler weather has moved in this week and I had just the right dish in mind to kick-off the autumn season! I received a beautiful mini tart pan for my birthday that was waiting patiently to be broken-in; I also had a handful of sweet potatoes in the pantry. This recipe was a product of both!


Tarts are a great option for bakers who hate to mess with normal full-size pie crusts. The dough for these four-inch pans was easily managed and maneuvered around my countertop. Aside from the ease, individual tarts have such a fancy quality to them! I think they would present quite nicely at the end of a dinner party with friends or family (Thanksgiving will be here before we know it!). One more point in favor of tarts over pies is that you can adjust the recipe to suit your crowd size. I actually made a smaller batch of three tarts by halving the ingredient list below.

I tend to shy away from creating my own recipes but I'm so pleased with how these beauties turned out! They are delicious but not overly sweet; I find sweet potatoes to be perfectly tasty without a single additive, but I did jazz these up with some cinnamon, nutmeg, and allspice. It is also a relatively healthy dessert since I kept the sugar and butter to a minimum. The streusel topping is a must for both flavor and texture. I loved the combination of smooth filling and crunchy topping!

Sweet Potato Tarts
Yields 6 four-inch tarts (1-inch deep)

Dough:
2 cups all-purpose flour
2 tablespoons sugar
1/4 teaspoon salt
1 1/2 sticks butter, cold and cut into small cubes
1/2 cup of cold water (you may not use it all!)

Sweet Potato Filling:
4-6 small sweet potatoes, baked and mashed
6 tablespoons brown sugar
1-2 teaspoons cinnamon
1/2 teaspoon freshly ground nutmeg
Dash of allspice

Pecan Streusal Topping:
1/4 - 1/2 cup brown sugar
4 tablespoons flour
4 tablespoons butter, melted
1/2 cup chopped pecans
1/2 cup oats

Prepare the Dough
Stir together the flour, sugar, and salt. Once well combined, cut in small chunks of cold butter. You want the butter to be COLD, so keep it in the fridge until you are ready to add it. You can cut in / incorporate the butter using an electric mixer, by hand with a pastry cutter (my preferred method), or a fork/knife (way too much work; buy a pastry cutter instead!). You need to integrate the butter and flour blend until the dough is crumbly and the butter chunks are no larger than a pea. Once done, slowly pour a few tablespoons of cold water into the dough. Don't add all of the water at once! Stir and repeat just until the dough mostly sticks together. Transfer dough onto a floured countertop or plastic wrap. Knead the dough a few times to form a ball. Divide in half, reform into two balls (or thick discs) and wrap completely in plastic wrap. Refrigerate for at least an hour.

Tarts
Roll out the refrigerated dough (to about 1/4-inch thickness) and cut into 6-inch circles. Place these in greased tart pans.

Tip: measure your kitchen bowls or pot lids to see if any are the right size. I found one of mine to be 6.25 inches and it functioned like a giant cookie cutter. It made my job much easier!

Optional —  Pre-bake the empty tart shells for 3-5 minutes at 425°F. I did this and noticed the crusts did not keep their shape (the edges sort of slid down into the tart pans. Before I added the filling, I simply reformed the shells with a spatula and they turned out just fine.

Combine all of the filling ingredients and spoon into the tart shells. Smooth out the filling along the tops of the tarts.

Combine all of the streusal ingredients and sprinkle evenly over the tarts. Add a couple of pecan-halves to the centers.

Bake for 25-30 minutes at 375°F. After cooling for a few minutes, the tarts should remove easily from their pans with a little help from a fork or knife.


Tuesday, July 30, 2013

Eat: Mediterranean Chickpea Salad


Missouri is not known for having the best weather. We seem to jump entirely too quickly from icy cold winters to sweltering humid summers. Lately, though, we have been blessed with strangely mild temperatures. This interim may be short, but it is quite lovely and very welcome. Matt and I try to take full advantage of nice weather with lots of picnics. I'm always keeping my eyes peeled for recipes that are "picnic-ready", meaning I can grab it from the fridge and off we go to a nearby park. You may think this criteria is limiting but not so when you're armed with the handy dandy internet.

I just recently tried this recipe for Mediterranean Chickpea Salad and loved it! I'm up for any dish with feta and this particular concoction displays an appealing variety of colors and textures. Chickpea (or garbanzo bean) salads are a healthier and heartier alternative to pasta salads. An excellent source of protein and fiber, chickpeas are proven to curb hunger and lower LDL (bad) cholesterol. They can also give you an energy boost with their high iron levels -- something I definitely need!


Mediterranean Chickpea Salad
Makes 4 (1-cup) servings

1 (15 oz) can of chickpeas*
1 teaspoon dried parsley
1 cup bell peppers, diced
1/8 cup cup Kalamata olives, sliced
2 oz feta cheese, crumbled
1/8 cup red onion, finely chopped
1/2 cup cucumber, diced

For the Dressing...
1/2 Tablespoon lemon juice
1/2 Tablespoon red wine vinegar
1/4 teaspoon garlic, minced
1 Tablespoon plain low fat yogurt
Salt and pepper (or to taste)

Drain and rinse chickpeas. Place in a large bowl. After you have washed and chopped all of the vegetables, add them to the bowl of chickpeas. Sprinkle with the feta and olives.

In a separate container or bowl, thoroughly mix the dressing ingredients for the dressing. Pour this over the salad and toss to coat. Chill in your fridge for about an hour prior to eating.

*Note: I actually prefer to cook large batches of chickpeas and freeze them in 2 cup bags. It is highly cost effective and takes no time at all -- especially if you have a slow cooker. Here is a helpful overview.

***

I encourage you to find easy recipes that let you get outside and enjoy the nice weather in your neck of the woods!


Wednesday, July 17, 2013

Eat: Berry Galette

The birthday of a grown-up can often be...underwhelming. The odds are that you're working that day, which most likely means that the majority of it will be hum drum. You go about your business, maybe treat yourself to a candy bar from the vending machine, and hope have a nice dinner that night. In an effort to combat this regular-day-syndrome, Matt and I have a lovely tradition of Birthday Breakfast. It is a relatively low key affair: the birthday boy or girl gets a special breakfast complete with candles and a solo serenade of "Happy Birthday". It makes for a surprisingly awesome morning and puts both of us in a great mood for the day.


This year, to mark Matthew's birthday I made a beautiful galette with strawberries and blueberries along with a side of greek yogurt. Galette is a generic French term for flat, round, and flaky pastries. As with many of my breakfast dishes, you can switch this up with whatever mix of fruit you prefer. On the 4th of July I made it with blueberries and raspberries. This dish is a quick snap to make, especially if you use a pre-made pie crust. It presents and tastes like a pie but is much healthier  because it doesn't have a syrup loaded with refined sugar. The fruit naturally creates a syrup when mixed with cornstarch. We were both crazy about this dish and I immediately added it to my regular-rotation-recipe stash.


Berry Galette

1 pie crust dough, homemade or store-bought (thaw ahead of time)
2-3 cups of mixed berries
1 tsp cinnamon
2 tsp cornstarch
Egg, beaten

Preheat the oven to 400 °F.

Roll out the pie crust flat onto a greased (or parchment paper-lined) baking sheet. In a large bowl, mix together the fruit, cinnamon, and cornstarch.

Spoon the mixture onto the center of the pie crust leaving about a 2-inch border of dough. Gently fold the edges of the dough over the filling.

Brush the top edges of the dough with a beaten egg. If desired, sprinkle with a bit cinnamon and sugar. Bake for 20-25 minutes or until the crust is golden brown. Let it cool on the pan for a couple minutes before cutting.

If serving for breakfast, include a few scoops of yogurt on the side. For dessert, this pairs nicely with vanilla ice cream or whipped cream.


Wednesday, July 10, 2013

Eat: Easy Eggless Chocolate Cake


A few weeks ago, I shared the delicious Peach Upside Down Cake I made for Father's Day. Knowing my family to be serious dessert-lovers, right beforehand I decided to add another cake to the day's menu. This Easy Eggless Chocolate Cake lives up to its name and was the perfect choice for a last minute dessert. It has a short list of ingredients all likely to be in pantry--thereby avoiding a trip to your grocery store. It is also quick snap to prepare; within 10 minutes of starting this cake, I had it baking in the oven.

 
Depending on the topping you use, this cake can go in several different directions. I've made it twice and both times I paired it with a batch of homemade chocolate sauce. A plated piece of chocolate cake drizzled with a simple sauce presents beautifully, saves you time, and cuts calories.

Easy Eggless Chocolate Cake

1 1/2 cups all-purpose flour
1 cup sugar
3 tablespoons unsweetened cocoa powder
1 teaspoon baking soda
1/2 teaspoon coarse salt
1/3 cup vegetable oil
1 teaspoon pure vanilla extract
1 tablespoon white vinegar
1 cup cold water

Preheat oven to 350°F.

In a large bowl, stir together the "dry" ingredients: all-purpose flour, sugar, unsweetened cocoa powder, baking soda, and coarse salt.

Make a well in center of flour mixture and add the "wet" ingredients: vegetable oil, pure vanilla extract, white vinegar, and cold water.

Whisk until well combined and pour the batter into a greased 8-inch round baking pan. Bake 35-40 minutes or until a toothpick inserted in center comes out clean. Let cool completely in pan on a wire rack prior to flipping onto a serving platter.


recipe source: martha stewart

Thursday, July 04, 2013

Eat: Barbecue Chicken Chopped Salad

This week, Matt and I have been gearing up for the 4th of July with a variety of barbecue dishes. Among them, we've enjoyed turkey burgers, pork ribs, and a surprisingly big hit: Barbecue Chicken Chopped Salad. It has a decidedly southwestern theme and was inspired by one of my favorite restaurants, Crushed Red. They serve chopped salads which are delightful but often leave me wondering if I could whip up something just as tasty. The answer? Yes. Yes I can.


This was easy to throw together yet has a lovely presentation when plated. One could easily substitute ingredients or vary the proportions. It's a delicious summer-time meal that is filling but doesn't leave you feeling heavy or weighed down. I imagine it would be appealing to those who don't care for traditional barbecue fare and those who don't care for salads! Clearly, Matt and I both loved it; Matt mentioned the dinner a few times throughout the night--well after we had finished eating. A sure sign of success!

Barbecue Chicken Chopped Salad
Serves 2

In a large bowl, mix together:
  • a few bunches of greens (spinach, lettuce, sprouts, etc.), chopped into bite-sized pieces
  • 1/2 cup cooked corn
  • 1/2 cup black beans
  • 1 tomato, chopped
  • 1 small red onion, chopped
Toss everything together with your choice of barbecue sauce*. Start with a little bit, then add more to your liking. Remember, you can always add more but it's tough to get rid of too much. Divide the salad mix among two plates.

Using that same mixing bowl, toss 1-2 chicken breasts (cooked and cut into strips or bite-sized pieces) with some more barbecue sauce. Season with chili powder to taste. Divide the chicken evenly, sprinkling it over the plated salads.

Call your dining partner into the room and impress him/her. At least that's what I did.

*It's worth noting that the barbecue sauce you select goes a long way to shape the taste. You can also mix equal parts barbecue sauce with ranch dressing.

This homemade Balsamic Honey BBQ Sauce is an absolute favorite in our house!
In a medium saucepan, combine:
  • 1 cup balsamic vinegar
  • 3/4 cup ketchup
  • 1/3 cup packed brown sugar
  • 1/4 cup honey
  • 1 tablespoon Worcestershire sauce
  • 1 tablespoon Dijon-style mustard
  • 1 clove garlic, minced
  • 1/2 teaspoon ground black pepper
  • 1/4 teaspoon salt
Bring to boiling; reduce heat. Simmer, uncovered, for 20 to 25 minutes or until slightly thickened, stirring occasionally.

Hope you have wonderful 4th!


Thursday, June 27, 2013

Eat: Peach Upside Down Cake


This Peach Upside Down Cake is one of the two desserts I made for Father's Day. My family tends to prefer chocolate confections, so I really did not expect this to go over well. That's also why I made a second cake with a homemade chocolate sauce (stay tuned for that one!). Much to my pleasant surprise, everyone devoured this beautiful peach cake with barely a leftover piece to spare!


Obviously, this cake is gorgeous and presents wonderfullythat's actually what first motivated me to make it. What you can't appreciate unless you try it is the unique texture. When I poured the batter into the pan, it was almost completely full. Worried it would surely spill over while baking, I repeatedly checked the oven. Fortunately, these efforts weren't necessary as there was zero overflow. Instead, the batter is meant to rise only a little, making the cake quite dense and moist. Also, the cake itself is not particularly sweet since it's topped with (amply sweet!) carmelized sugar and peaches. All in all, a very unusual but fantastic dessert.

Peach Upside Down Cake
Serves 8-10

1 stick plus 3 tablespoons butter (divided)
3/4 cup light brown sugar
2-3 large peaches, sliced (around 1/2 - 3/4 inch thick)
3/4 cup white sugar
1 teaspoon vanilla extract
2 eggs at room temperature
1 1/2 cups flour
1 1/2 teaspoons baking powder, aluminum-free
1/4 teaspoon salt
1/2 cup milk

Preheat the oven to  350°F.

In a small sauce pan, combine 3 tablespoons of the butter and all of the brown sugar. Heat on medium-high until the sugar is melted, stirring continually. When it starts to bubble, remove the pan from heat and pour the carmelized sugar into a greased 8" or 9" round baking pan. Use a spatula to spread the caramelize sugar around the pan (essentially lining the bottom of the pan with sugar).

Arrange the peach slices in the pan, creating a visually appealing pattern (remember this will be the top of the cake).

In a large bowl, Beat the remaining stick butter and sugar together until they are combined and smooth. Add the vanilla, then beat in one egg at a time.

In a separate bowl, mix together the the flour, baking powder, and salt together. Stir half of the dry ingredients into the batter. Now add the milk, then the remainder of the dry ingredients. Don't overmix the batter. Pour the batter over the peaches in the pan, spreading it around to fill in the spaces between the fruit.

Bake 45-50 minutes or until the edges of the cake pull from the sides and the center is not gooey. Take out of the oven and let the cake cool in the pan for 20 minutes. Flip the cake onto a serving platter. If able, serve warm.

Note: When flipping the cake out of the pan, wear your oven mitts! There may be small streams of caramelized sugar that can burn your hands.  


recipe source: use real butter

Monday, June 17, 2013

Eat: Father's Day Cilantro Lime Chicken

Yesterday, we hosted a casual Father's Day lunch at my house. Everyone pitched in, so we enjoyed a quite a large spread of Mexican-style fare. We are a clan of varied tastes, so I opted for two different entrees one for the picky eaters and another for the more adventurous. I also made not one but two cakes! Both desserts were big hits that I'm excited to share in upcoming posts. The day was filled with the usual hectic energy of bigger family gatherings. Fortunately, the weather was nice so we were able to burn some calories outside. My favorite part of the day was the entire group walking together to a nearby park where we played around until dessert time. Matt and I go there at least once a week during the warmer seasons, so we were glad to share it with the family.


Myself, my dad, and my sister!


For the traditional half of the crowd, we had regular ground beef tacos with homemade seasoning. I highly recommend making your own taco seasoning. Not only do you avoid the artificial and processed "extras" found in many of the store-bought mixes but you also get to experiment to find just the right seasoning blend for your family's preferences. You can find countless examples online. The other dish I made is one of my absolute favorite slow cooker recipes: Cilantro Lime Chicken with Black Beans and Corn. I have made this more often than any other dinner recipe in my arsenal. I originally got it from Mama & Baby Love, which offers tons of other healthy dishes worth trying. Aside from being flavorful, it is a simple recipe with quick and easy preparation. I also love that it has black beans and corn in it, adding a bit more substance to the dish.


Cilantro Lime Chicken with Black Beans and Corn
Serve 6

1.5 lbs chicken breasts
1-2 tablespoons olive oil
Juice of 1 lime
1 cup fresh cilantro OR several hearty dashes of dried
1 (15oz) can of corn, drained
2 tablespoons of garlic, minced
1 small onion, finely chopped
1 can of black beans, rinsed
2 teaspoons ground cumin
Salt/Pepper, to taste

Combine ingredients in a slow cooker and cook on LOW 8 hours or HIGH 4 hours. Prior to serving, remove the chicken, shred it, then stir it back into the slow cooker blend. Add some additional cumin, salt, pepper, and lime juice to taste.

***

I hope you all had a great Father's Day!


Monday, June 10, 2013

Eat: Pumpkin Spice Beignets

Oddly enough, one of my favorite things about travel is relishing the comfort that comes when I get home. I love our house and have enjoyed getting back into the swing of things. I'm not suggesting that I like heading back to work or tackling our mountain of laundry, but I gladly welcome the peace I feel standing in my kitchen, listening to NPR while chopping some fresh produce. I'd like to note that produce was given to us by my wonderfully thoughtful mother-in-law who stocked the fridge upon our return!

At the top of my list-of-reasons-I'm-happy-to-be-home ? Breakfast, of course! This weekend was a busy one, but not so busy that we couldn't enjoy a big breakfast together. Matt handled the coffee and scrambled eggs – both excellent and far better than when I make either. Meanwhile, I tried a new (modified by me) recipe for Pumpkin Spice Beignets. This was originally a recipe for baked donuts in the traditional shape, which would have been great except I don't have a donut pan. Matthew very smartly suggested we call them beignets, the French version of donuts. This perfectly tied together our recent visit to Montreal (where we actually ate some beignets) and National Donut Day.


The final verdict? Delicious, especially when served warm while the butter glaze is fresh. They are surprisingly dense but also very moist. As expected, pumpkin is most prominent flavor but the vanilla is quite strong too. I would not skip the cinnamon-sugar coating  – not because these aren't tasty when plain, rather it makes them more like true beignets.

Pumpkin Spice Beignets
Yields 12

1 3/4 cups flour
1 1/2 teaspoons baking powder
1/2 teaspoon salt
1 teaspoon cinnamon
1/2 teaspoon nutmeg
1/2 teaspoon allspice
1/8 teaspoons ground cloves
1/3 cup vegetable oil
1/2 cup brown sugar
1 egg
1 1/2 teaspoon vanilla extract
3/4 cup canned pumpkin
1/2 cup milk

For the Glaze
1/2 cup butter, melted
1/3 cup sugar
1-2 teaspoons cinnamon

Preheat oven 350° F. In a bowl mix together the flour, baking powder, salt and all of the spices.

In a separate bowl, mix together the remaining ingredients (excluding the butter/sugar/cinnamon for glazing). Gradually add the dry ingredients into the blend. Stir until everything is combined, taking care not to over mix.

Fill each greased cup with the batter. Bake for 20 minutes or until they spring back when gently pressed. Cool for a few minutes in the pan, then remove and place on wire rack. 

While the beignets are cooling, set up your "glazing station". Get two small bowls: one for the melted butter and another for the blended sugar and cinnamon. While the beignets are warm, dip in the melted butter then roll in the sugar/cinnamon blend. If possible, serve warm.

Voilà!

Thursday, June 06, 2013

Go: Eat Out In Canada

Hello there!

I am sorry that my posting has been incredibly inconsistent the last couple of months. While I love gathering and executing recipes and crafts, I have found myself lately lacking the energy and/or motivation to write about them. I've also been assessing my overall vision for Making a Living. This mixed with a busy season full of major home projects and travel has resulted in very few blog posts. If you are a regular reader of mine, I apologize. I promise to make it up to you with a bunch of great posts I have coming along!

As I said, we've done a bit of traveling over the past few months including a very recent trip to Montreal and Toronto. It was us versus the rain most days, but overall it was a great vacation! A friend of mine asked what my favorite part of our trip was. I thought about it for a few seconds and confidently replied: The Food. Oh man! Montreal and Toronto both offered such a wide variety of restaurants, bakeries, and cafés! We always strive to eat well on vacation, but neither Matt nor I remember enjoying our meals nearly as much on previous trips.

Since food is one of the cornerstones of Making a Living, I think it would be appropriate to share some of our culinary exploits while across the border. I've included links below and highly recommend all of these restaurants. I may also try my hand at recreating some of these dishes. Enjoy!

Montreal


Le Givres
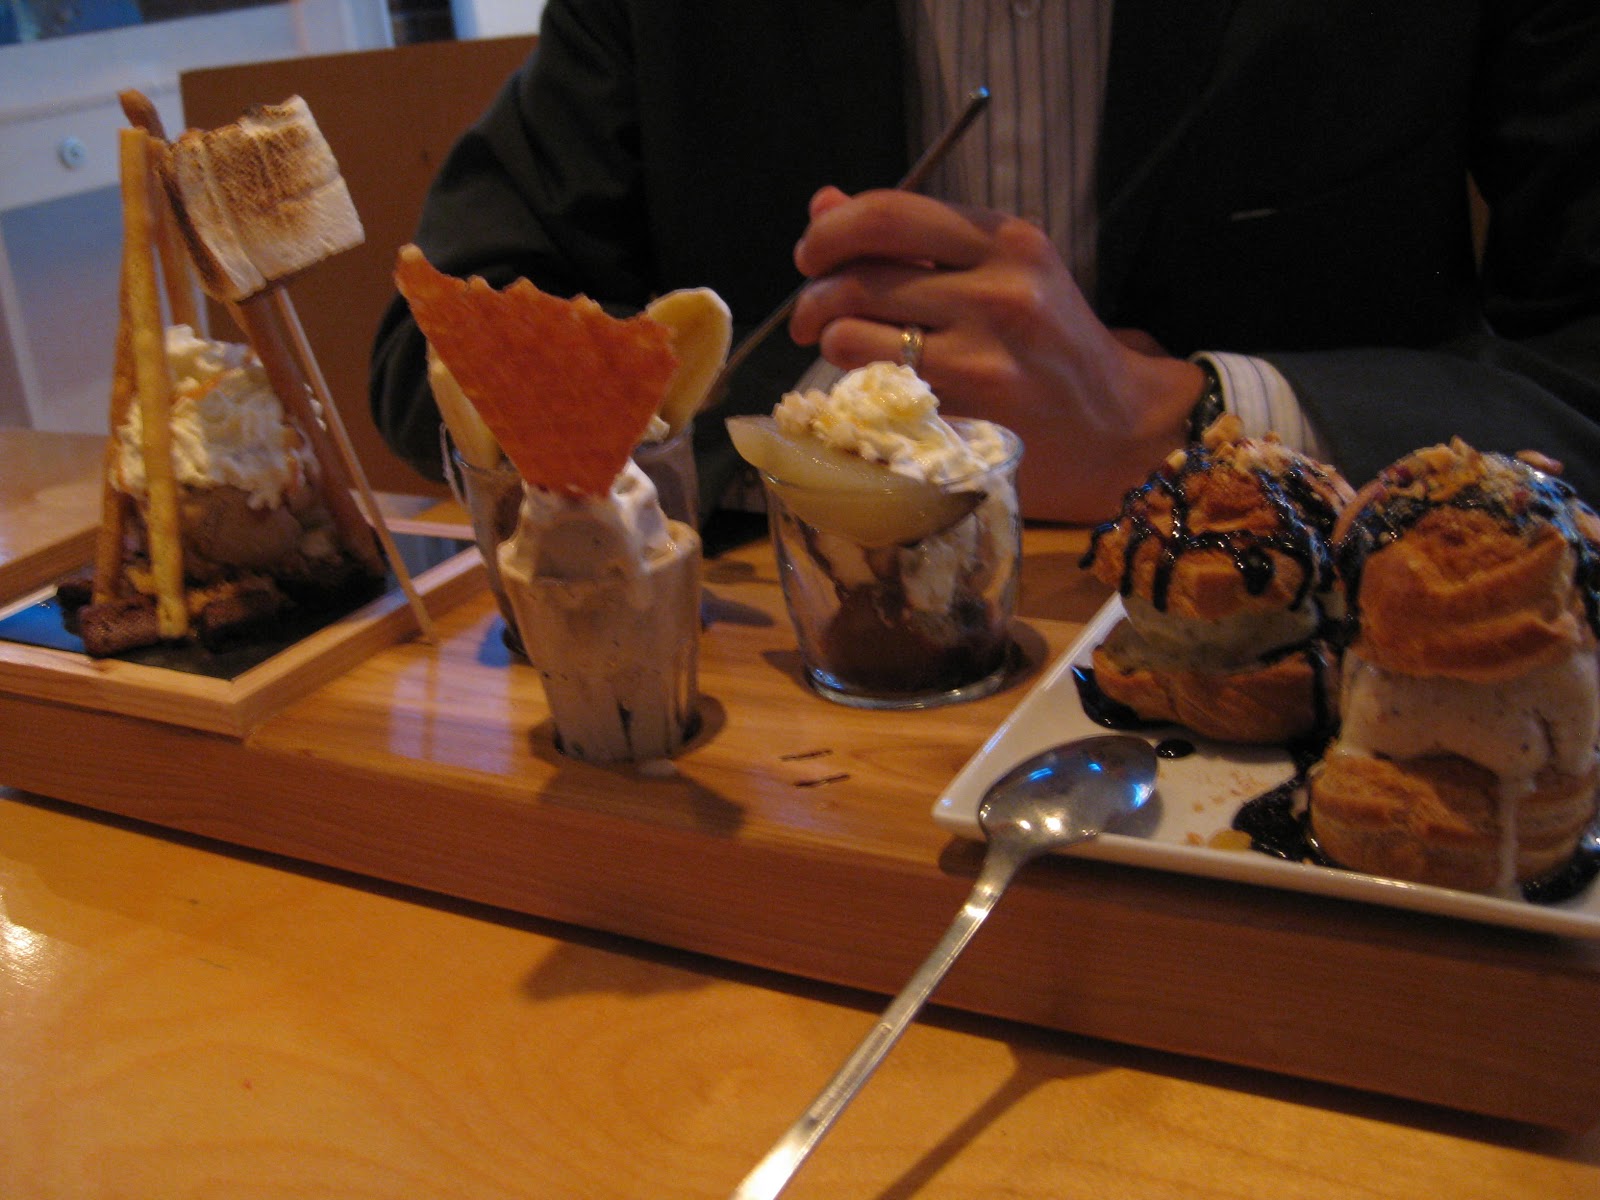
This was our very first night in Montreal and decided to start the vacation with a bang! By "bang", I mean a giant dessert for dinner. We ordered the "Dégustation pour Deux" which translates into Tasting for Two. Not only was this delicious, it felt positively decadent; I only wish would could have savored it more slowly--but ice cream does melt rather quickly.

It featured a mini "campfire" of pastry sticks, brownie bites topped with caramelized brown sugar, ice cream, and whipped cream; A big roasted homemade marshmallow; Organic bananas with chocolate ice cream & a brownie; Coffee ice cream with whipped cream and waffle cone; Poached pears with vanilla ice cream, spice cake, and caramelized ginger; Mini eclairs with pistachio ice cream and praline ice cream. I suggested we eat this for dinner every night in Montreal!

***


La Crêperie du Marché
We ended our second day by roaming the Jean Talon Market, a large covered market selling everything you can think of, from meat and fish to honey and lavender. It was tough to decide from which booth we would get dinner, but La Crêperie du Marché won. I was surprised by how different the crepes looked from what we would usually find back home, their dark brown crispy exterior and square shape. Matthew went the semi-sweet route with melted apples, torchon ham, swiss cheese, and maple syrup. I opted for straight-up savory with asparagus, béchamel sauce, swiss cheese, torchon ham. A choir happened to set up shop next to our table, so we enjoyed some lovely choral music while eating!

***


This Venezuelan restaurant is a top contender for our favorite. It is a small space with brightly colored walls, warm atmosphere, and low lighting--hence the dark photo above. Arepas are flatbread sandwiches with a texture similar to english muffins. I decided to be extra adventurous and tried the smoked shark with plantains. I would compare the flavor to lobster (lightly sweet but still fishy). Matthew went with the spicy pulled pork and a sauce hot enough to make his eyes water. We also shared cassavas chips with a delicious avocado sauce. Cassava is a starchy tuberous root of a tropical tree--and tasty when fried!

***


After a long day of walking and burning calories, we treated ourselves to some fancy french pastries. It took a long time to actually find this bakery, but it was well worth the search! Matthew ordered crème brûlée and I got the pain au chocolat aux amandes (or chocolate pastry with almonds).This is one dish I will definitely try to make. Somehow I doubt it would be as good!


Toronto


The prologue to our dining experience at Thai to Go was less than pleasant. Lots of rain. Lots of walking in the rain. Lots of shoes filled with rain. Once we stepped into the restaurant, though, we were given some of the best service we've ever seen and delicious thai cuisine! I had the Mango Tofu Stirfry while Matt enjoyed the Pineapple Shrimp Curry. The restaurant offered us free drinks (we opted for cranberry juice) and a free dessert of green tea and pastries that flaked apart beautifully when bitten. I honestly think they would have kept serving us free pastries indefinitely had we stuck around long enough!

***


Among the many places to explore in Toronto is the historic Distillery District. What began as the Gooderham and Worts Distillery has become a large center of independent shops and restaurants, mantaining its old-time charm. It was great to see the city utilize what would otherwise be an abandoned part of town. One particular shop that kept our interest (we visited it three times!) was SOMA Chocolate where we tried the Spicy Mayan Chocolate. It tastes like it sounds: hot and spicy with a rich, deep chocolate flavor. Yum! I liked it enough to buy a packet for my parents to try.

***


Bibim Q
Boy, oh boy! The amount of food that came with these meals was overwhelming. I can tell you what we ordered (the Bulgogi and the Bibimbap Soya) but I'm not sure will mean very much to you. Instead, I list everything we got between the two of us: fried egg, tofu, rib eye steak, rice, coleslaw, clear noodles, salad, tons of vegetables, and something reminiscent of cold mashed potatoes. I wasn't sold on the cold mashed potatoes but everything else was fantastic! We enjoyed this meal en plein air at Queen's Park. We even used chopsticks.

***


This market was very similar to Jean Talon of Montreal, so I loved it! A few people told us that we should try the "butter tarts" which are generally regarded as a speciality of Toronto. So while searching for souvenirs and strawberries, we bought a few tarts. They reminded me of the mini pecan tarts I've made in the past, except much larger and much sweeter. I felt like I was drinking maple syrup from a pastry cup! My sweet tooth was thoroughly satiated for a long while!


***


Capitano Burgers
Toronto must have a major thing for burgers. Everywhere I looked, I saw a different restaurant for "gourmet burgers". So near the end of our trip we gave in and gave them a try. I must say, we were not disappointed! Matt and I each declared that they were the best burgers we'd ever had. Seriously. My burger featured the restaurant's namesake "Capitano Sauce" which I can best describe as a creamy sweet mustard. Matt (as usual!) went for the spicy option--I guess I must really be depriving him of hot spices at home.

**


Behold, the last meal of our vacation! We tried to eat at Merryberry for our first night in Toronto, only to discover (after a rainy walk) that they close early on Tuesdays! I was bitter for a few days but Matt convinced me we should give it another chance. I am so glad that we did! The space could not have been cuter and everything on the menu was unique and appetizing. Matt wasn't particularly hungry, so he ordered a bowl of Mango Gazpacho. I'm telling you, this was the trip of the mango! We ordered it whenever we could! My sandwich also featured the fruit, along with smoked salmon, pesto, goat cheese, roasted peppers, and sprouts. Such a strange combination of ingredients but they came together beautifully! This one is also my list of meals to copycat at home.

***

So there you have it! Of course, there are more meals and stories worth sharing but this post is already quite lengthy. All of these meals reinforced how important it is to step outside of your comfort zone with food and try new things--even if they have strange ingredients like shark! I'm going to incorporate some of these experiences into my own cooking regime. Stayed tuned for those attempts!

Thursday, April 11, 2013

Eat: Muffins Galore!

 
Blueberry Muffins. Photography. Encyclopædia Britannica Image Quest. Web. 9 Apr 2013. http://quest.eb.com/images/156_2422768
Courtesy of Britannica ImageQuest
A few weeks ago, I shared a basic scone recipe that can be modified a number of ways depending on your mood and on-hand ingredients. Well, I've come to love that concept so much that I sought out something similar for muffins and quick breads. The possibilities are as limitless as your imaginationor your online searching skills. This recipe is much quicker than my scones, since you don't have to cut-in butter (I task I strongly dislike and often leaves me with sore wrists). When I'm feeling particularly lazy, I opt for the loaf version of this recipe instead of muffins. The differing instructions and baking times are included below.


Base Muffin Recipe (Betty Crocker Cookbook, 2005 edition)
Prep Time: 10 minutes
Bake Time: 18 minutes
Yield: 12 muffins or 1 (9”) loaf 

1-3/4 cups all-purpose flour
1/3 to 1/2 cup sugar
2 teaspoons baking powder
1/2 teaspoon salt
1 large egg, beaten
3/4 cup milk
1/4 cup cooking oil
Extras (see below for ideas) 

1. Preheat oven to 375° F if making muffins OR 350° F if making a loaf. Grease your pan. 

2. In a medium bowl combine the flour, sugar, baking powder and salt. In another bowl combine the egg, milk and oil. Add the egg mixture all at once to the flour mixture. Stir just until moistened and lumpy. Incorporate any extras (see list below). 

3. Spoon batter into the prepared muffin cups or loaf pan, (muffin cups should be two-thirds full). 

4. For muffins, bake 18 to 20 minutes or until golden and a wooden toothpick inserted in centers comes out clean.

For a loaf, bake 50 minutes or until golden and a wooden toothpick inserted in centers comes out clean. 

6. Remove from the oven and cool in the pan on a wire rack for 5 minutes. Remove from pan and transfer to wire racks to cool a bit more.


Easy Muffin/Bread Variations

Apple Cinnamon: Stir in one chopped apple (with or without the skin depending on your preference) and 1/2 teaspoon cinnamon. Substitute packed brown sugar for the granulated sugar.

Bacon: Add 2-4 strips of bacon, fried crisp and crumbled, to the batter.

Banana-Nut: Decrease the milk to 1/3 cup, stir in 2-3 mashed bananas (around 1 cup) and 1/3 cup chopped nuts with the milk. Substitute packed brown sugar for the sugar.

Blueberry: Gently stir 1 cup fresh or frozen berries and, if desired, 1 teaspoon finely shredded lemon zest into the batter.

Raisin Bran: Pour the milk on 1-1/2 cups whole bran cereal and let stand for 10 minutes. Add this to the egg and oil. Decrease the flour to 1-1/4 cups and add 1/2 cup raisins. Optional: add 1/4 cup of molasses.

Cheesy: Stir 1/2 cup shredded cheese. into the flour mixture. Great options include Cheddar, Monterey Jack, or Feta.

Double Chocolate: Stir in 2-3 T cocoa powder and 1 cup semisweet chocolate chips. You can also add a splash of vanilla or almond extract.

Cornbread: (Do not use whole wheat flour.) Decrease flour to 1 cup and stir in 1 cup cornmeal with the flour.

Cranberry: Combine 1 cup coarsely chopped cranberries (fresh or dried) and 2 tablespoons additional sugar. Gently stir this into the batter. You can also add 1 T finely grated orange peel.

Date Nut: Stir in 1/2 cup chopped pitted dates (or raisins) and 1/3 cup chopped nuts.

"Donuts": Stir in 1/2 cup ground nutmeg with the flour. Once baked, immediately dip the hot muffins in about 1/2 cup butter, melted, then in a mixture of 1/2 cup sugar and 1 teaspoon cinnamon.

Oatmeal: Decrease flour to 1 cup and stir in 1 cup quick-cooking oats, 1/2 teaspoon ground nutmeg and 1/2 teaspoon cinnamon with the flour.

Pecan: Use 1/4 cup sugar. Add 1/2 cup chopped pecans to the batter. After filling the cups, sprinkle with sugar, cinnamon and more chopped nuts. 

Poppy Seed: Increase sugar to 1/2 cup and add 1 tablespoon poppy seeds to the flour mixture.

Pumpkin: (Don’t use whole wheat flour.) Stir in 1/2 cup pumpkin puree and 1/2 cup raisins with the milk and 2 teaspoons pumpkin pie spice with the flour. Sprinkle the tops with sugar before baking if desired.

Spiced: Stir in 1 teaspoon cinnamon, 1/2 teaspoon ground allspice, 1/2 teaspoon ground ginger and a pinch of ground cloves and ground nutmeg with the flour.

Zucchini: Stir in 1 cup grated zucchini (squeezed dry to remove excess moisture) and 1/2 cup chopped walnuts with the milk.

Many of these ideas can be combined, like Spiced Pecan, Blueberry Poppyseed, or Chocolate Oatmeal. So far, I've only tried the Double Chocolate (with a handful of oats thrown in), but I'm planning to make a batch of Spiced Pecan this week!

Wednesday, March 27, 2013

Eat: Cinnamon Swirl Banana Bread


Last Sunday it snowed.

And snowed.

And snowed.

All of our plans were cancelled and all of the weekend chores were completed. I found myself with a whole lot of free time. Plus there was a small pile of bananas on the kitchen counter getting spottier and spottier by the minute. What else was a girl to do but bake some homemade banana bread? I checked out several recipes and compiled them into this deeeelicious cinnamon swirl confection. Let me tell ya, it's very good. Several-compliments-from-my-husband good. It has a lighter texture than that of most quick breads. The cinnamon-sugar flavor is a subtle and appetizing addition to the traditional flavor and it is a healthier alternative to chocolate banana bread.


Cinnamon Swirl Banana Bread

2 cups self-rising flour flour*
2/3 cup sugar
1/4 cup butter, softened
2 eggs
1/3 cup vanilla yogurt (or regular yogurt + splash of vanilla extract)
3 ripe bananas, mashed
1/4 cup sugar
1-2 tsp cinnamon

*If you don't have self-rising flour, substitute with 2 cups regular flour, 1 tsp baking powder, 1/2 tsp salt.

Preheat your oven to 350°F.

Cream together the sugar and softened butter. Incorporate the eggs one at a time, then the yogurt and mashed bananas. Now mix in the self-rising flour (or previously combined flour, baking powder, and salt).

Pour about half of the batter into a greased loaf pan (8.5 x 4.5 inches). Now in a separate bowl, stir together the cinnamon and sugar. Pour about half of that onto the batter. Using a clean tooth pick or knife, swirl the cinnamon-sugar blend into the batter. Pour the remaining batter into the pan and top with the remaining cinnamon-sugar.

Bake for approximately 50 minutes. Allow the pan to cool slightly (5-10 minutes) before removing your bread. Run a knife along the interior sides of the pan to loosen the loaf. Invert the pan onto a plate to remove the bread. Then flip the loaf again right-side up.

Be sure to grab a slice while it is still warm!

Tip: Do you have some rapidly ripening bananas? Just toss them as-is into the freezer and save them for when you have time to bake. They will turn black and once thawed be a bit of a mushy mess. That being said, they are perfectly good for baking! Just smoosh the fruit out of the peel and into a bowl.