Showing posts with label Kids. Show all posts

Wednesday, October 09, 2013

Make: Ribbon Burp Cloths


"So...this is for a baby to throw up on?" was the question my husband asked while I made these adorable burp cloths for a pregnant friend. His inquiry was understandable. I suppose the only explanation is that babies are cute and (gosh darnit!) everything they have might as well be cute too. Have you seen cloth diapers lately? Positively darling yet they have a not-so-pleasant purpose! I made a batch of these ribbon burp cloths a while back (for the same pal that received these baby shoes and headband) and found them to be a breeze! Embellished burp cloths are a great DIY gift for your next baby shower, especially if you are short on time and/or a beginner sewer.


Ribbon Burp Cloths

Supplies Needed:
Prefold cloth diaper (or a plain burp cloth)
Ribbon
The usual gear: sewing machine, pins, sheers, coordinating thread, iron
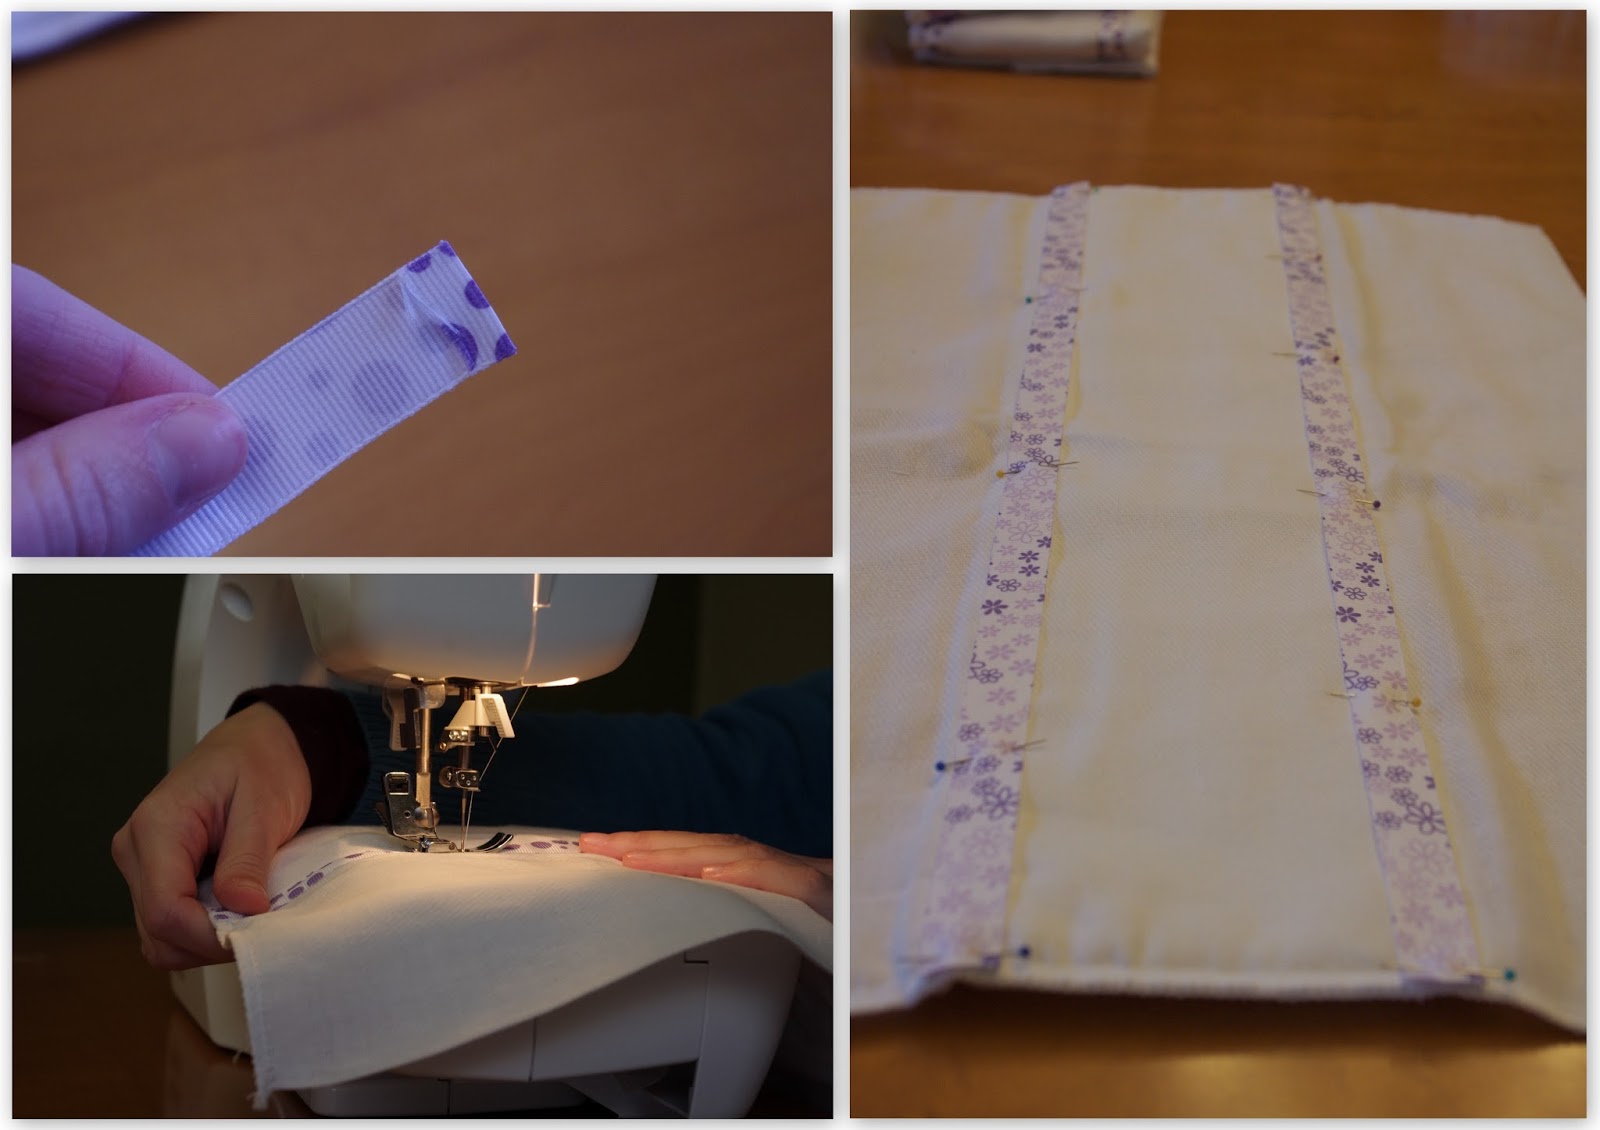


Measure the length of your burp cloths and add 1-inch to that measurement. Cut two ribbon pieces by that length.

Simply fold the raw ends of the ribbon down 1/2-inch and iron to keep folded (I used my hair straightener because it is a bit easier to get the fold exactly where you want it).

Lay the ribbon down on the burp cloth and pin into place. Repeat for the other ribbon.

Using a straight seam, sew along all of the edges of the ribbons.

Optional: I had a bit of ribbon leftover so I tied some sweet little bows and sewed them onto the burp cloths too.

And that's it! I look forward to more of my friends having babies so I can make more of these adorable burp cloths! Even if they are for a less-than-cute purpose.


Friday, April 05, 2013

Make: Baby Shoes & Headband!

My friend Sarah is getting ready to have her first baby, which is exciting for a great number of reasons--the least of which is that I've gotten to make her a handful of cute baby crafts! The toughest part was narrowing down my long list of options. These oh-so-adorable shoes and headband were too sweet to skip!


 The best part? Both projects were super simple!

Felt Slippers

You can find several slightly different patterns online. I selected one by Martha Stewart found here. I had to print it out a few times while fine-tuning the scale. You want the sole to be roughly 3 inches long.

Then you use the stencil to draw and cut out both shapes on felt fabric.  Pin the top of the shoe (marked "upper" on the template) to the sole. Now slowly sew the pieces together. Don't worry if your seam is not completely straight!

Turn it inside out and voila! A baby shoe. Now you can decide what to do with the strap. I opted to sew a tiny button on one strap and carefully cut a short slit on the other strap. Other ideas include ribbon ties (short pieces sewn on each strap) or a small length of elastic (<1") permanently connecting the straps.

We've arrived at the best part: decorating! Flowers and bows are always fun, but I wanted something less common. I stacked two circles in contrasting colors then secured them onto the shoe with a white button.

Repeat for the second shoe.


Circle Headband

Once the shoes were finished, the headband pretty much designed itself. I sewed together 12 inches of narrow elastic and continued the circle-stack motif in a line of three along the elastic. I made sure to cover the elastic seam with one of the circles. To clean up the back of the headband (and hopefully make it more comfortable for baby), I glued a thin strip of white felt along the back sides of the circles (sandwiching the elastic).

Here is a quick overview of headband sizes for babies:
  • Newborn: 12 inches
  • 3-6 months: 13 inches
  • 6-12 months: 14 inches
  • 18-24 months: 16 inches

My only regret with this project is that both are sized for a brand spankin' new baby. She won't get to rock them for very long!


Thursday, February 28, 2013

Make: Dinosaur Hoodie


I cannot believe how long it has taken for me to write a post about this super adorable--ahem, I mean totally cool, big kid Dinosaur Hoodie. I made this as a Christmas present for my nephew, Colin. He loves dressing up as superheroes, so the idea of a pseudo-costume he can wear out in the real world was perfect!

I enjoy projects like this that are simple and customizable. You can make this for a boy or girl in whatever colors and patterns they prefer. You could also mix things up by using shapes other than triangles. It took me less than hour for the entire project, including cutting out the little felt pieces. Would you like to make one for the kiddo in your life? Would you rather make one for yourself? Either way, here's how!


Dinosaur Hoodie

You will need:
Hoodie
Felt
Scissors
Paper for template/stencil
Sewing supplies (sewing machine, thread, pins)

Begin by deciding how large you would like the "spikes" (or triangles along the spine) to be and draw a diamond that equals TWO of those triangles. You can also download this handy dandy template from Ginger & George. Cut out the paper template and use it to create as many felt diamonds as you want. I opted for several small "spikes" rather than a few large ones. I made twelve total.

There is a good chance that the hoodie has a seam running down the back. If so, you are in luck! Using this seam as a guide, pin the diamonds down the center of the hoodie--starting at the front of the hood and working your way to the bottom of the back of the shirt (see photo). If there is not a seam, then do your best to pin the felt pieces in a straight line.

Stitch along this line of diamond, taking care to go through the middle of each diamond.


Now fold each felt diamond in half and pin the side side together.

Finally, sew a straight seam around the edges of each triangle. I liked the idea of the spikes being flexible and flopping around as Colin runs about. But you could also reinforce the triangles with a bit of interfacing before sewing up the edges.

Do you see what's happening? Ah yes, now they are little triangles!

Now your little guy or gal is ready to transform into a dinosaur for the day!


Sunday, September 02, 2012

Make: DIY Jet-Pack


I was so excited when I first came across this DIY jet-pack on Pinterest! It is a cute and wonderfully creative way to upcycle soda bottles. It was also inexpensive, something I love in a craft!

Considering that I don't have children of my own, my niece and nephews are forced to endure much of their aunt's craft-enthusiasm. I made this for my sister's son, Colin, since his 3rd birthday was just around the corner. He also went through a brief but potent Buzz Lightyear phase.

You may be wondering why I am modeling this creation, rather than my nephew. Well, right now he adamantly hates having his picture taken (he hollers "No cheese! No cheese!"). Or he is running around so fast that I can't get a clear photograph. So I strapped on that puppy and set the self-timer on my camera.

This project is straightforward and allows for much improvisation in supplies, techniques, and colors. I was able to figure it out along the way, but here is a streamlined set of instructions.

Paint two 2-liter bottles (I chose gray)
Paint a strip of heavy-duty cardboard (preferably in a color coordinating with the bottles)
Glue bottles to each other and onto the cardboard
Attach straps--I used strips of velcro so the jet-pack can grow with the little astronaut!
Cut thin strips of felt fabric, glue the ends together, and glue those ends onto the bottle caps.

Note: I used a combination of Elmer's Glue and my hot glue gun. After some consideration (of how rambunctious my nephew is) I reinforced everything with duct tape. You can use your own discretion in this.

That's it! Or is it?? Sure, you could stop now and have a plain, mediocre jet-pack. However, I decided Colin's jet-pack was lacking a certain je ne sais quoi. I saved an image of the NASA logo and inserted it into a Word document. Then, I found this great website that lets users try the official NASA font without downloading it! I copy & pasted that text-image on top of the logo. Voila! And yes, that sign is laminated--no worries about spills! I must say that I am immensely proud of this project and had to keep myself from going around Colin's party asking  people what they thought of the jet-pack.

Matthew did manage to take a slightly blurry but hilarious picture of Colin opening the gift at his birthday party. He is always making the best faces!

"Woah!"

The overall awkwardness of this picture makes me laugh.