Showing posts with label autumn. Show all posts

Friday, October 18, 2013

Drink: Pumpkin Cider Sangria


The fall-themed recipes continue this week with Pumpkin Cider Sangria! This is a fun twist on traditional sangria, which generally consists of wine, chopped fruit, sweetener, and brandy. I was inspired by this recipe for Apple Cider Sangria on How Sweet It Is, but wanted to tweak it a little bit. The combination of fall flavors and cool refreshment is a bit odd, but I think all of the elements come together quite nicely.

I should note that it is very, very rare that I am enticed enough by a drink recipe that I actually go about buying all of the ingredients to make it. Why? I don't know. I happily buy ingredients for food recipes. Whatever the reason, it apparently did not apply to this drink! I gathered the fixins within a few days and it was thoroughly enjoyed within a few days!

Pumpkin Cider Sangria
Serves 6-8

1 bottle of dry white wine
2-3 cups pumpkin cider (not hard cider)
1 cup club soda
1/2 cup brandy (traditional sangria calls for brandy but gin or rum can be substituted)
2 small apples, chopped
2 pears, chopped

Combine all of the ingredients in a large pitcher. Refrigerate for at least an hour before drinking, unless all of your ingredients were already cold. Give the pitcher a good stir before serving.

This will last in the fridge for 2-3 days before the fruit gets soggy.

Tuesday, September 24, 2013

Eat: Sweet Potato Tarts

The first half of September featured a very unwelcome heat wave. How am I supposed to start decorating my house with fall leaves and wrap myself with a chunky cableknit sweater when it is ONE HUNDRED degrees outside?! Fortunately, cooler weather has moved in this week and I had just the right dish in mind to kick-off the autumn season! I received a beautiful mini tart pan for my birthday that was waiting patiently to be broken-in; I also had a handful of sweet potatoes in the pantry. This recipe was a product of both!


Tarts are a great option for bakers who hate to mess with normal full-size pie crusts. The dough for these four-inch pans was easily managed and maneuvered around my countertop. Aside from the ease, individual tarts have such a fancy quality to them! I think they would present quite nicely at the end of a dinner party with friends or family (Thanksgiving will be here before we know it!). One more point in favor of tarts over pies is that you can adjust the recipe to suit your crowd size. I actually made a smaller batch of three tarts by halving the ingredient list below.

I tend to shy away from creating my own recipes but I'm so pleased with how these beauties turned out! They are delicious but not overly sweet; I find sweet potatoes to be perfectly tasty without a single additive, but I did jazz these up with some cinnamon, nutmeg, and allspice. It is also a relatively healthy dessert since I kept the sugar and butter to a minimum. The streusel topping is a must for both flavor and texture. I loved the combination of smooth filling and crunchy topping!

Sweet Potato Tarts
Yields 6 four-inch tarts (1-inch deep)

Dough:
2 cups all-purpose flour
2 tablespoons sugar
1/4 teaspoon salt
1 1/2 sticks butter, cold and cut into small cubes
1/2 cup of cold water (you may not use it all!)

Sweet Potato Filling:
4-6 small sweet potatoes, baked and mashed
6 tablespoons brown sugar
1-2 teaspoons cinnamon
1/2 teaspoon freshly ground nutmeg
Dash of allspice

Pecan Streusal Topping:
1/4 - 1/2 cup brown sugar
4 tablespoons flour
4 tablespoons butter, melted
1/2 cup chopped pecans
1/2 cup oats

Prepare the Dough
Stir together the flour, sugar, and salt. Once well combined, cut in small chunks of cold butter. You want the butter to be COLD, so keep it in the fridge until you are ready to add it. You can cut in / incorporate the butter using an electric mixer, by hand with a pastry cutter (my preferred method), or a fork/knife (way too much work; buy a pastry cutter instead!). You need to integrate the butter and flour blend until the dough is crumbly and the butter chunks are no larger than a pea. Once done, slowly pour a few tablespoons of cold water into the dough. Don't add all of the water at once! Stir and repeat just until the dough mostly sticks together. Transfer dough onto a floured countertop or plastic wrap. Knead the dough a few times to form a ball. Divide in half, reform into two balls (or thick discs) and wrap completely in plastic wrap. Refrigerate for at least an hour.

Tarts
Roll out the refrigerated dough (to about 1/4-inch thickness) and cut into 6-inch circles. Place these in greased tart pans.

Tip: measure your kitchen bowls or pot lids to see if any are the right size. I found one of mine to be 6.25 inches and it functioned like a giant cookie cutter. It made my job much easier!

Optional —  Pre-bake the empty tart shells for 3-5 minutes at 425°F. I did this and noticed the crusts did not keep their shape (the edges sort of slid down into the tart pans. Before I added the filling, I simply reformed the shells with a spatula and they turned out just fine.

Combine all of the filling ingredients and spoon into the tart shells. Smooth out the filling along the tops of the tarts.

Combine all of the streusal ingredients and sprinkle evenly over the tarts. Add a couple of pecan-halves to the centers.

Bake for 25-30 minutes at 375°F. After cooling for a few minutes, the tarts should remove easily from their pans with a little help from a fork or knife.


Tuesday, September 10, 2013

Picnic Ready!


St. Louisans know that we have very small windows in between our cold, slushy winters and our too-hot, too-humid summers. These small windows of spring and fall? Oh my, do I love them! Matthew resides in the same boat as me, so whenever the weather approaches mild we go into "picnic mode".

"Picnic Mode" is not some passing fancy of oh, let's try to have a picnic next weekend. It is a full on attack of every park within walking distance of our home. In doing so, we tend to race against the clock once we get home from work--especially in autumn when the sun starts setting early. Over the years, I've found a few easy ways to maximize our post-work-picnic-potential. The common thread throughout is to keep things easy and to keep things ready.

Food and Beverages:
  • Glass bottles of water in the fridge (when you get home, fill 'em back up and pop 'em back in the fridge)
  • If we know the weather report for the coming week is good, I’ll make a big batch of something that lasts for several days in the fridge. Think salad: pasta salad, chopped salad, chicken salad, chickpea salad, or bean salad/salsa (like this or this). If I am really on the ball, I will divide it into smaller portioned tupperware. Note: in the photo above, I was not on the ball but just grabbed the whole bowl and carried it to the park!
  • Generally speaking, our fridge is always stocked with chopped veggies, hummus, dressings, and cheese (don't forget to grab some crackers from the pantry). Throw any of these into your cooler and blammo! instant picnic fare. I'll pair some combination of these foods with a more substantial dish (see above) and call it done.
Getting Around:
I have a lightweight insulated tote bag that is perfect for quick picnics. You can find these almost everywhere (Target, Walmart, Amazon, BB&B, and the like). I keep it regularly stocked with the following.
  • Disposable forks, knives, and spoons
  • Bottle opener with cork screw (you never know when you might opt for some wine/beer!)
  • Paper plates and napkins
  • Bug Spray
  • Wet wipes/hand sanitizer
  • Little cutting board & knife (for cheese)
So when we get home from work, I grab the grub and toss everything into my bag. If there happens to be some extra room, I might throw in a freezer pack to keep everything chilled. And that's it. We sail out the door to enjoy some lovely scenery and each other's company. It's really one of my favorite things that to do with Matthew; I can't think of a better way to decompress from the workday! So as fall approaches (we are currently having a heatwave in St. Louis) get yourself ready to relish it with just a little bit of organization.


Wednesday, November 14, 2012

Eat: Roasted Acorn Squash...a Matthew Ritter production


The world is comprised of those who like to cook and those who do not. Of the former, the divide continues further with recipe people and non-recipe people. I fall into the first camp. Matthew falls into the second. I want/need to know exactly how much of exactly what to add exactly when. Matt, on the other hand, is a freewheeling MacGyver in the kitchen. This is the man who added coffee--coffee--to a pot of chili! Grape jelly in stir fry! Soda in barbecue sauce! And do you know what? It works deliciously every time. He is a nice yin to my culinary yang.

All that is to say that this recipe for Stuffed Roasted Acorn Squash is a Matthew Ritter original. The dish is a great combination of fancy presentation and comfort food taste. The ready-made bowls present prettily with their scalloped edges and orange flesh. The acorn squash itself has a smooth texture and subtle nutty flavor. Both of these characteristics areamplified by a filling of walnuts and couscous. Then every few bites you get the unexpected yet complementary tart kick of cranberry. A wonderful mix!

On an unrelated note, I would like to add that I have been very busy lately crafting it up like you wouldn't believe. However, all of my recent projects have been Christmas-themed and I'm afraid that it is just too early to start posting it. The retailers of America would disagree. So get ready for a flurry of fun posts in a few weeks!

Stuffed Roasted Acorn Squash

2 acorn squash
2 tablespoons olive oil
1/2 teaspoon dried sage
2 garlic cloves
2 shallots
3/4 cup water
1/4 cup ginger ale
2/3 cup couscous
1/2 cup walnuts, chopped
1/4-1/3 cup dried cranberries

Begin by cutting the squash in half horizontally and removing the seeds and stems. Pour a small amount of water into a shallow baking pan, just enough to line the bottom. Then place each squash half (cut-side down) into the pan. Roast for 40-45 minutes at 355°F.

Towards the end of roasting time, you should prepare the stuffing. Heat the olive oil in a medium size saucepan and add your sage, garlic, and shallots. After a few minutes, pour in the water and ginger ale. Once boiling, stir in the couscous and remove the pan from heat. The couscous should absorb all liquid. If not, heat additionally as needed. Lastly, stir in the walnuts and dried cranberries

After the squash are roasted, plate each half and fill with stuffing.

***

Want another great fall-time recipe? This week I made Pumpkin Spiced French Toast.

Wednesday, October 31, 2012

Happy Halloween!


Happy Halloween, everyone! As a lover of this holiday, I hope you are making it a fun one: handing out candy, trick-or-treating with the kiddos, partying somewhere in a non-sexy costume, so on and so forth...

Tonight, Matthew and I continue our tradition (3rd year running!) of bundling up and hanging out on the front porch, regardless of how cold gets. We fight the chill with the help of glühwein, or warm mulled wine. The first Halloween in our neighborhood we underestimated how much candy to buy, with the children arriving in large packs. So naturally, last year we overshot it and barely had a dozen trick-or-treaters! Tonight will tip the scales one way or the other.

I also made a batch of super easy Halloween snack mix (or if you are feeling especially festive, Scarecrow Crunch). Here's the recipe:

Mix together in a large bowl...
  • 4 cups cereal (shredded wheat, cheerios, oatmeal squares...whatever you like)
  • 4 cups mini pretzels
  • 22oz bag candy corn and pumpkins
  • 2 cups caramel popcorn
  • 2 cups Reese's Pieces (tip: a bag of chocolate/peanut butter chips is way cheaper!)
  • 1 cup Teddy Grahams
You can add to this list or substitute any of the ingredients with similar fare.

On a related note, I have spent a good chunk of the last two weeks getting our costumes ready for a friend's Halloween party. I've alternated between hunching over my sewing machine and roaming thrift stores. I will share the final products after the party, so we can enjoy the element of surprise!

Have a great night!


***

Fall Recipe of the Week: Curried Sweet Potato & Lentil Stew

Thursday, October 18, 2012

Make: Fall To-Do


Generally, whenever something becomes overly prevalent in the populace I'm turned off by it completely. That's just the hipster hidden inside me, I guess. That something might be a fashion trend, celebrity, book, movie, or catchphrase. "Bucket List" definitely falls into that last something category. However, I do appreciate the sentiment. So I decided to apply the sentiment (but not the word!) to this fall season. I love autumn so much and it always flies by too quickly! So I thought it might be smart to make a priority list and thereby better use our time.

I also just love making lists. So much.

Confession Time: I originally printed this out in cute fonts and colors with the intention of displaying it proudly on the fridge, but...I lost it. Oops.

So here it is with a little mid-term progress report!

Happy-Fun-Fall-Time-To-Do-List

Visit a pumpkin patch OR vineyard
           This is currently penciled in my datebook. Ste Genevieve, here we come!

Go on a picnic

           Is it cheating if I combine this with our vineyard trip?

Make an autumn banner 
         
           Well, I did half of it but then decided I do not like the design; back to the drawing board! 

Make s’mores
          Done! Complete with a fire pit and friends.

Front Porch Halloween Tradition
          14 days to go!
         
Tour Anheuser Busch
          I have no clue when we are going to be able to do this.

Spend as much time as possible outside, be it sitting or walking
          This was Matthew's suggestion, and we have indeed been outside many times.

Try one new fall-time recipe each week
          So far, so good! I've tried Pumpkin Chocolate Cookies, Butternut Squash Stuffed Pasta, Butternut Squash Chili, Honey Apple Pork Tenderloin (I also threw in 4 chopped sweet potatoes), and up next are Pumpkin Oat Muffins.
         

What do you hope to do this fall? How can you get it from To-Do  to  Done?!


Thursday, October 11, 2012

Eat: Butternut Squash Stuffed Pasta

While the dish was great, this photo is not. For that, I apologize.

This delicious dish, Butternut Squash Stuffed Pasta Shells with Thyme Butter Sauce, was the result of an impulse buy. Matt and I had just finished up a brunch date with his mom when we decided to mosey over to the next-door produce stand. I was in need of a pumpkin for the front porch and it offered an impressive selection.

We felt like such hip, locally-conscience urbanites shopping at the little stand that we began roaming the aisle trying to decide what other produce we could plausibly need after a recent trip to the grocery store. We both stopped in front of the butternut squash box and knew we'd found our treasure. Before we made it to the check-out counter, I had already chosen this recipe from my mental list of Pinterest Finds To Try.

The dish had a very long preparation and (honestly) was poorly selected as a workday meal. Fortunately, Matt can tell when I'm getting overwhelmed and the wheels are about to come off. He graciously jumped in, helped out, and by 7pm we were digging in to some extremely tasty pasta. The texture of the filling is smooth and creamy, with a subtle sweetness. Usually after conquering an involved recipe, I rarely think I will repeat it--mainly because I enjoy attempting new recipes. However, this was so good that I fully intend to make it again, although probably as a lasagna for faster assembly.

I modified the original recipe a fair amount, and I strongly suggest you follow my ingredient list!


Butternut Squash Stuffed Pasta Shells with Thyme Butter Sauce

Butternut Squash, peeled and chopped (4 cups)
Jumbo pasta shells (roughly 20, depending on how stuffed you want them to be)
16 oz Ricotta
1/3 cup parmesan cheese
1 garlic clove, minced
½ cup frozen spinach, drained
1 egg
Salt & pepper, to taste

Toss the squash in some olive oil and spread the pieces out in a large baking pan. Roast for 15-20 minutes at 425°F.

Utilize this time to cook the pasta shells according to the package’s directions.

Once the squash has roasted, you should be able to easily smash it with a fork. If not, continue cooking in the oven for a few minutes at a time, checking it regularly. In a large bowl combine the smashed squash, Ricotta, Parmesan, garlic, spinach, egg, salt, and pepper.

Wait until the pasta shells are cool enough to touch, then stuff each with heaping spoonfuls of the filling. This is a great time to call in the family for assistance.

After putting the shells in a greased baking pan, bake for roughly 10 minutes at 350°F.

NOTE: The original recipe calls for 20 minutes at 400°F. Don’t do this! I followed the instructions and regretted it; a few of the pasta shells were overcooked and crunchy. Gross.

To prepare the sauce, melt 1 stick of butter in a small pan, then add thyme to taste. Drizzle this sparingly over the pasta. If desired, sprinkle with additional Parmesan cheese.

Thursday, September 27, 2012

Make: Easy Fall Décor

I grew up in an enthusiastic home. This enthusiasm could be applied to a wide range of topics and occasions, but particularly holidays and seasons. We celebrated everything in full-force: the front porch wreaths and flags had quarterly rotations, my mother wore timely appliqués, we started planning our next Halloween costumes on November 1st, and even now my sister and I (along with our husbands) get Easter baskets. It was great.
 
Most of that perennial enthusiasm has stayed with me (with the exception of appliqués). I just love having my home reflect the year's changes. Packing away the lemons and apples to be replaced with pine cones and acorns feels like I am drawing a giant orange highlighter over the declaration
"Fall is here!".  I also just get tired of looking at the same stuff year-round!

If you think that seasonal décor is too much hassle, know that you can make just a few small changes that shift the overall feel of your home. You also don't need to spend a fortune. Most of what you see pictured here was either A) made by me or B) bought on the cheap. A festive home just takes a little effort and creativity. It helps if you live near a craft store too.

Front Porch


Let's start with the first thing that everyone sees: the front porch. Matthew and I take advantage of our porch whenever we can. It's not uncommon for us to load up our dinner plates and head for the Adirondacks. With this in mind, I try to make the space inviting for ourselves and guests alike.

In years past, I have lined our porch steps with pumpkins. Before long, however, they would be nibbled on and ruined by a few very pesky squirrels. This year I have a two pronged approach: just one pumpkin and I'm going to spray it with Apple Bitter. Fingers crossed it will last til Thanksgiving! The mums are a new addition that Matthew picked up at a nearby produce stand. The deep orange blooms are a welcome pop of color.

The front door wreath was a very easy and affordable DIY project. Actually, I believe it was the first thing I ever made for our house. I bought a simple grapevine wreath and LOTS of fake leaves from the dollar store. Then I arranged the leaves in a nice layout and hot-glued them into place. Done and done.


Living Room


I put the most effort into the space that we spend the most time: our living room. Our fireplace mantel is part-function, part-form since we keep most of our in-progress books there. Besides that unchanging component, I like to switch things up with staggered glass containers. They are a quick and easy way to transition from season to season. As referenced above, during spring and summer I fill the cylinders with apples, lemons, and limes. Now they are showcasing pine cones and autumnal potpourri. You will have to wait to see what winter looks like! I did a similar arrangement on the coffee table, using some leftover potpourri and three small pumpkins.

After seeing so many adorable word collages online, I decided to use some around the house. I printed a few, threw them in some super cheap frames and voila! Instant cute home décor with minimal effort. Here is a great collection of free printables.

Dining Room


Since I am not one for overkill, the fall decorations end here: the dining room. Naturally, my favorite new craft gets prominent placement on our dining room table. I found these chocolate brown placemats and napkins on clearance at Bed, Bath & Beyond. Wanting some additional color on the table, I then made the napkins rings. Similar to my front door wreath, this was another figure-it-out-as-I-go project. I cut up cardboard paper towel tubes and covered them with some extra-wide ribbon. Then I hot-glued faux leaves here and there until I was happy with the final product.

***

So there you have it! Hopefully this will inspire you to bring some seasonal beauty into your home!

On a related note, I'm excited to say that with the start of autumn begins a fun little "challenge" I'm posing to myself. I will to try one new fall-ish recipe each week! Sometimes I may write about them more extensively, but generally I will just provide a link at the end of my regular posts. Up first are some super easy Pumpkin Chocolate Cookies.


Monday, September 17, 2012

Make: Book-Pumpkin

I sometimes fall into the trap of drafting a crafty to-do list that is so long I end up making nothing at all. In an effort to combat this, a few weeks ago I prioritized which projects deserve the little free time I possess. This exceedingly cute book-pumpkin quickly rose through the ranks.


I adore fall decor (as you will see in a future post) and I love books, so this guy was a no-brainer. Once finished, I kept finding excuses to walk through my dining room and look at it.

I anticipate that house guests will ask me (with shiny hope in their eyes) from what book my darling pumpkin was made. The answer is a very boring United States Code Annotated, 2011. Upon closer inspection, onlookers will find decidedly unsexy text like:

Fees,
     Attorneys, ante
     Dockets and docketing, C4R 15(a)
     Extraordinary writs, prisoners C4R 21(c)
     Transcriptions, filing, sanctions, C4R IOP 11.1

As unromantic as that is, I just could not bring myself to ruin a perfectly good book!

In case you do not know, I work in law library which means that on a weekly basis we recycle volumes of publications that have been superseded. That is to say, if anyone were to use them for legal research they would be up a creak awful fast as the information is inaccurate. I'm just throwing that out there in case someone reading this cries foul, "Oh, how can a library throw away precious books!? For shame!". So I rescued a few of these books from the recycle bin and lugged them home for a bit of a makeover.

Supplies:
Book, cover removed
Cardboard
Pencil
Scissors
Stick (my husband gallantly found me one in the yard)
Ribbon
Broom (to clean up the mess of paper shards this project will leave on your floor)

Begin by creating a cardboard stencil. Think about how large you would like the pumpkin to be and draw the vertical half of that.


Then trace this shape on the first page of your book and cut through as many pages as you can at a time.


Repeat, repeat, repeat until you have made your way through the entire book. Of course, I chose a very thick book so I had to give my little wrists a few breaks along the way.

Glue a small stick to the spine of the book while also gluing together the front and back of the book. Secure it with clothes pins while it is drying, like so:


Once you are sure the glue is dry, you can jazz up the pumpkin with a cute bit of ribbon. The texture of my book's paper was very thin (like a phone book), so it required a lot of fussing over to make it sit nicely. If you use a regular book, I'm confident it will splay out naturally.

And that's it! You can make a single large pumpkin, a set of smaller ones, or a mix of sizes.


Sunday, November 13, 2011

Eat: (not your average) Pumpkin Soup


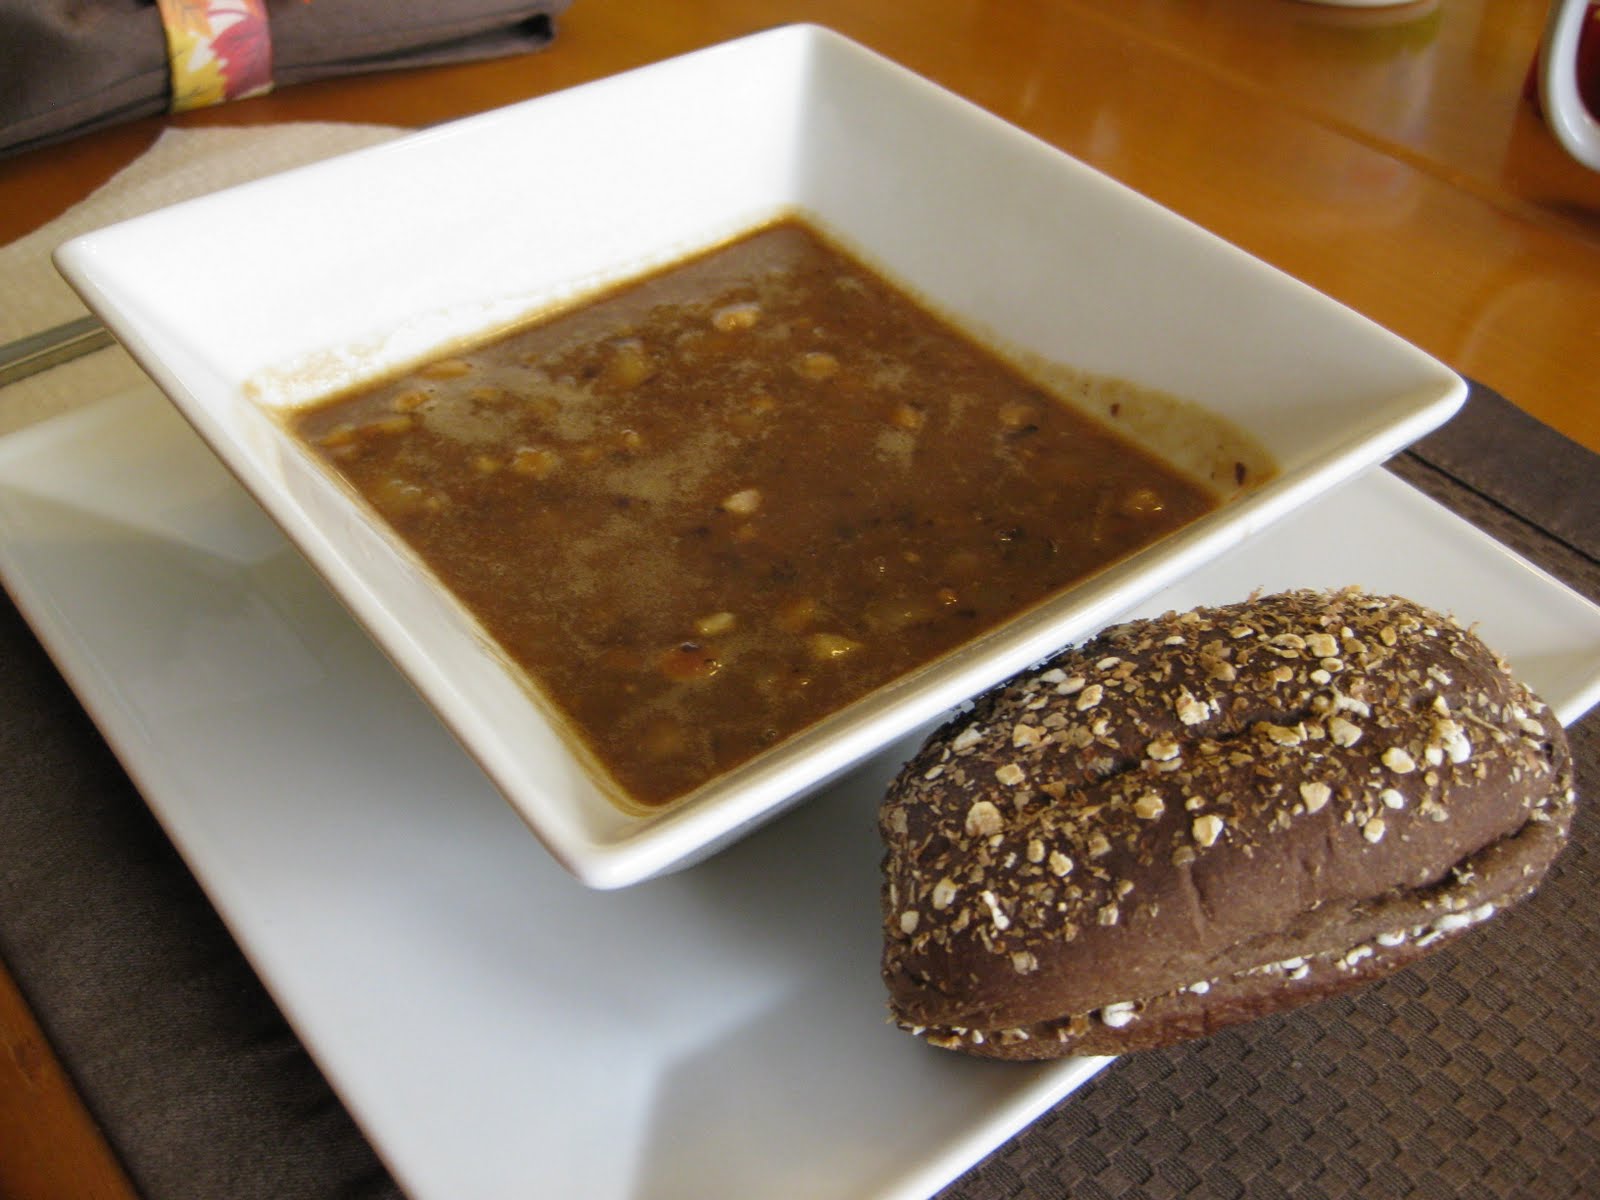
Earlier this week, after narrowing down my recipe choices, I called my husband to ask if he had a preference. The first option: spiced apple cake. The second option: pumpkin soup. Before I could even finish the sentence, Matthew eagerly declared “pumpkin soup!”. Thus began this culinary adventure. I was intrigued by this particular recipe because it includes several ingredients that I had never before seen in pumpkin or squash soup, like pureed black beans, balsamic vinegar, cumin, and shallots. Suffice it to say, this is not your grandmother’s pumpkin soup. What it lacks in appearance (dark brown instead of the soft orange I had imagined), it makes up for in rich and savory flavors. In the end, we both agreed (as did our dinner guests) that this soup does not actually taste like pumpkin at all. However, that does not mean that we didn’t like it. In fact, we loved it!

The original recipe, found in the November 1996 issue of Gourmet, uses Sherry and Sherry vinegar. Since I am not a fancy-pants lady, I did not happen to have either of these on hand. Fortunately, I found there are several alternatives. In place of Sherry, one can use dry white or red wine, vanilla extract (1 tsp for every 2 tbsp), apple cider vinegar, wine vinegars, or even citrus juice. I used apple cider vinegar but would only recommend it if you don’t mind the strong kick of vinegar. Should I make this again, I will try white wine instead. Similarly, in place of Sherry vinegar one can use red wine vinegar, balsamic vinegar, or cider vinegar.

TIME: 1 hour
YIELDS: 9 cups
MY SOUNDTRACK: Steve Martin & the Rare Bird Alert

three 15oz. cans of black beans, rinsed and drained
1 cup of diced tomatoes, drained
1 ¼ cups of chopped onion
½ cup minced shallot (or ¼ cup dried)
4 cloves garlic, minced
1 tablespoon & 2 teaspoons of cumin
1 teaspoon of salt
½ teaspoon of black pepper
½ stick of unsalted butter (1/4 cup)
4 cups of beef or vegetable broth
16oz. can of pureed pumpkin (not pie filling!)
½ cup of apple cider vinegar
3-4 tablespoons of balsamic vinegar
Optional: ½ - 1 pound of cooked ham, diced


1. In a food processor, combine beans and tomatoes. Puree coarsely.

2. Heat a large (at least 6-quart) pot to medium heat. Stir together the butter, onion, shallot, garlic, cumin, salt, and pepper. I added the butter first and let it melt before putting in the other ingredients.

3. Once the onion has softened and begins to brown, stir in the bean-tomato blend. Next add the pumpkin, broth, and apple cider vinegar. Simmer, uncovered, for approximately 25 minutes. Stir the dish occasionally to avoid burning along the bottom of the pot. You can check its progress by dipping a spoon into the pot; the soup should get thick enough to coat the spoon.

4. Before serving, add the balsamic vinegar and ham (if desired) and cook until heated through. You may garnish the dish with sour cream and toasted pumpkin seeds.


Sunday, October 16, 2011

Eat: Praline Pumpkin Cake


Everyone has their preferred season and autumn is definitely mine. What's not to love with all of the changing colors, unpacking of long forgotten sweaters, and multiple federal holidays? Not to mention that the season contains my birthday and wedding anniversary. Here in St. Louis, though, we’ve been enjoying an “Indian Summer” with average temperatures in the eighties. Don’t get me wrong, I am not complaining. I'm certainly glad to bask in the extended heat but it just doesn’t feel like fall yet. I have taken a few measures to battle this, including a significant collection of harvest décor in and around my home. I also brought my autumnal motivation to this week’s dish: Praline-Pumpkin Cake. Yes, it is as good as it sounds. Pureed pumpkin, candied pecans, pumpkin pie spice, and caramel sauce should definitely get you in the spirit of fall. Before you know it, you will be whipping up some apple cider and reaching for your warmest slippers and Snuggie.

Be forewarned that this dessert is seriously sugary. Depending on how sweet your sweet tooth is, you may want to skip some of the optional toppings or remember to cut thin slices. I opted to make a round two-layered cake for a more elegant presentation, but this cake could easily be modified for simpler construction in a 9x13-inch baking pan.

TIME: 2 hours & 15 minutes (including baking/cooling time)
YIELDS: 16 servings (small slices)
MY SOUNDTRACK: The Avett Brothers

1/2 cup butter or margarine
1/4 cup whipping cream
1 cup packed brown sugar
3/4 cup chopped pecans
1 box yellow cake mix
1 cup canned pumpkin (not pumpkin pie mix)
1/2 cup water
1/3 cup vegetable oil
4 eggs
1.5 teaspoons pumpkin pie spice (see below to learn how to make your own)
1 container cream cheese frosting
Optional: caramel sauce, additional chopped pecans

1. Heat oven to 325°F. Stir together the butter (I cut it into smaller portions), whipping cream, and brown sugar. Cook over low heat in a 1-quart saucepan, stirring occasionally until the butter melts. Pour praline blend into two ungreased 8 or 9 inch round cake pans. Sprinkle each evenly with the ¾ cup of pecans.

2. In a large bowl, beat together the cake mix, pumpkin puree, water, oil, eggs, and 1 teaspoon of the pumpkin pie spice. If using an electric mixer, beat on low speed until moistened then on medium speed 2 minutes. If mixing by hand, stir for several minutes, taking care to break up any lumps.

3. Carefully spoon batter on top of pecan-praline mixture in each pan. The batter will be too thick to pour.

4. Bake 40 to 45 minutes. Cool approximately 5 minutes in pans, then remove the cakes and transfer them to a cooling rack. Let them sit for about an hour, cooling completely.

5. Stir the remaining ½ teaspoon of pumpkin pie spice into frosting. Place one layer on a serving plate, praline side up. Cover the top with frosting. Top with the second cake layer, praline side up, and ice the entire cake with remaining frosting. The rough texture of the pecans will make it difficult to frost the cake completely (as you would a traditional cake) but it still presents nicely. An alternative is to use half of the frosting for the middle layer between cakes and the other half on the top of the cake.

Optional: drizzle the cake with caramel and sprinkle additional pecans on top.

This week's recipe can be found on Betty Crocker's wonderful website.

How to make your own Pumpkin Pie Spice…

Mix together:
1/2 teaspoon cinnamon
1/4 teaspoon ground ginger
1/8 teaspoon ground all spice
1/8 teaspoon ground nutmeg

Yields 1 teaspoon

Sunday, September 18, 2011

Eat: The Tasty Challenge of Pumpkin Ravioli


For this week’s dish I wanted to up the ante. I began looking for a seriously challenging recipe and boy did I find it! My first impression of this recipe for pumpkin ravioli was that it must be a sweet twist on traditionally savory ravlioi. This was due to all of my previous interactions with pumpkin dishes: pumpkin pie, pumpkin bread, even pumpkin cookies. However, I quickly learned that pumpkin in its purest form is not even remotely sweet. In fact, as far as I could tell (or rather, taste) it does not taste like much of anything by itself.

An interesting aspect of this recipe is the use of wonton wrappers in place of pasta. The upside to this is the drastically shortened preparation time. Wonton wrappers function like ready-made pasta without any cooking. The downside to this trick is that after putting so much effort into making perfect little pockets of cheese, many of them opened up while boiling. So if you give this dish a try, be emotionally prepared to watch some of the fruits of your labor burst open. Otherwise, it was a fun challenge with tasty results! I particularly enjoyed the tomato and ginger sauce, which would also pair well with traditional pasta.

TIME: 1.5 hours
YEILDS: 6-8 servings
MY SOUNDTRACK: She & Him, Mates of State

Ravioli...

1 teaspoon oil
4 oz. onion, finely chopped
2 cloves garlic, minced
15 oz. pumpkin puree (NOT pumpkin pie filling)
15 oz. ricotta cheese
2 egg (1 will act as "glue" for ravioli)
1/2 teaspoon salt
freshly ground pepper, to taste
12 oz. (approximately 50) wonton wrappers
cornstarch for dusting pan

Begin by heating oil in a small skillet. Sauté the onion and garlic for a few minutes until softened.

In a large bowl, beat one of the eggs with salt and pepper. Stir in the pumpkin and ricotta cheese. Add the onion and garlic mixture. Blend thoroughly, scrapping the sides and bottom of the bowl.

To make the ravioli: Prepare two baking sheets by dusting them with the cornstarch. Put one teaspoon of filling in the middle of a wonton wrapper (which is fairly delicate, so handle gently gentle). Dip your index fingers into a beaten egg and line the edges of the wrapper. Fold diagonally into a triangle and press the edges firmly to seal the pocket. Place on baking sheet. Repeat for each wonton wrapper.

To cook: Bring a large port of water to a boil. Add a few teaspoons of water to prevent the ravioli from sticking together. Gently add each ravioli to the pot and bring the water back to a boil for a few minutes.

To serve: This is where things can get a little dicey. If some of the ravioli have opened while cooking, I would not recommend draining the water. All of the filling will escape into the sink leaving you with a pile of plain cooked pasta. Instead, remove the ravioli from the pot using a slatted spoon. You can then spoon out any of the filling in the pot and add it to your plated pasta. Top with tomato ginger sauce (see recipe below).

Tomato Ginger Sauce...

1 tablespoon oil
6 oz. onion, finely chopped
2 cloves garlic, minced
1 tablespoon of fresh ginger or 1-2 teaspoons of dried
½ teaspoon salt
Freshly ground pepper, to taste
28 oz. can of diced tomatoes, with juice (do not drain!)

In a medium saucepan or skillet, heat oil. Cook the onion and garlic until tender. Add the ginger and tomatoes. Bring to a boil briefly and simmer for 10-15 minutes. If it is too thick, you can add a pinch of water. For a smoother texture, puree the sauce.

This week's recipe came from my husband's own collection. Unfortunately, he cannot recall where he originally found it.